Showing posts with label 1922CraftsmanBungalow. Show all posts

Sunday, May 9, 2021

My Home Office and a GIVEAWAY

Hello there! Did you miss me?

Life is difficult right now, but I'm making it through.  Slowly but surely!  Anywhoobs, lets get right to my office and the giveaway!

This is my office / craft room / cat room.  Yes, I share my office with my cats, its just easier that way for me and them!  Their area is on the opposite wall of this one.  Of course I don't photograph that area very much because honestly, its not really that pretty right now! Haha!

I found my little vintage desk and chair at an antique shop here in my town for only $75!  Can you believe that? Yeah, me either.  When I saw the price tag I immediately went to the clerk and said I wanted the desk and chair.  I had been looking for a desk for so long and I was so happy when I found it!  I love it!

I love collecting gold frames.  Some have mirrors and some are just frames.  I usually pick them up at Goodwill.  They are cheap yall.  I'm a cheapo, so I don't pay much on these frames, but aren't they pretty all on one wall?

Now for the G I V E A W A Y!  Who loves ceiling fans? Me! I do!  This one is vintage inspired and it fits perfectly in my office!

If you would like a chance to win one, go on over to my Instagram page and enter.  HURRY, because the contest is over Wednesday the 12th at noon!

Good luck!

If you loved this idea and want to save it for later, be sure to pin it to your favorite Pinterest board.  I have a Pinterest board set up for all things related to decor and its called Farmhouse Decor Ideas and I'm pinning something new every day. Won't you join me?

GREAT NEWS!  I now have an Amazon Storefront!  If you ever want to purchase anything I'm showing you here, you can pop over to my shop and see what I've picked out for you! Click right here to visit.
 

It doesn't have to be done all at once.  It is a slow process in the works! C-ya next time!

Pin It!

Sunday, March 28, 2021

Our Farmhouse Spring Living Room

Hello there, how are you?  We are doing great!

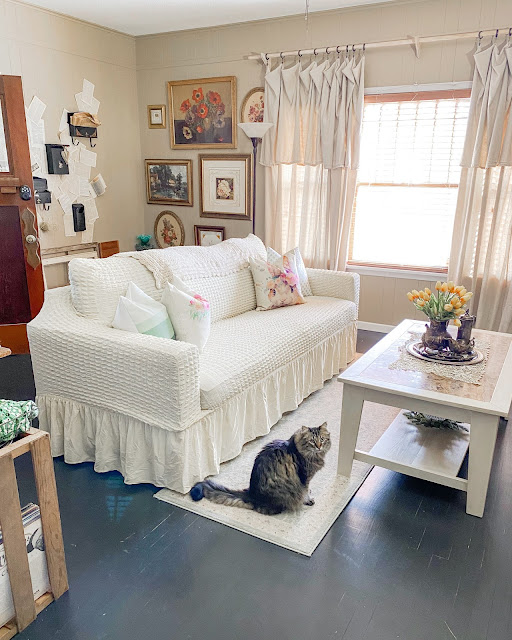
I recently got a new slip cover for our couch in the living room and I thought I'd share it with you along with a few other Spring decorations I have in here. Oh, and the cats too....can't forget them, they go where Mama goes! Ha!

Here's Zel helping me with the photos of the new slip cover.  Isn't the cover so cute? I love that it's Farmhouse style to go with my vibes in here!

I have the cover linked in my Amazon shop if you need one too! :)  My couch slip cover is a size large in light yellow.  This is the second Surbtex slip cover we've purchased.  They are so easy to put on and wash up very well!


With three fur people in our home, we need a slip cover!  This is Hazel.  I'm not kidding when I say that when I start snapping photos, the two fuzzy people show up to pose for me.  They are naturals.

Piper on the other hand, does not like to have her picture taken.  Her Daddy was distracting her from the kitchen when I snapped this cute photo!  I have these pillow covers in my shop too, right here.

Did you know you can find FREE printables on Pinterest?  That's where I found this sweet bunny.  I made that big carrot on the right.  See how you can make one too, right here.  The old book page eggs I made are here.

My collection of vintage tarnished silver grows quite often, even my hubs buys it for me!  I love creating beautiful centerpieces with it! Find the beautiful life like tulips here.  They really feel and look real and you get lots for your dollar!

Did you see how we made our DIY curtain rod and curtains?  Check it out here.

I hope you've enjoyed the little tour of our living room Spring decor!  We are going to be working in the yard today to try and get ready for warmer weather!  Enjoy your day! :)

Visit me over on Instagram @texasbluebingalow for pretty views of my vintage decor!

If you loved this idea and want to save it for later, be sure to pin it to your favorite Pinterest board.  I have a Pinterest board set up for all things related to decor and its called Farmhouse Decor Ideas and I'm pinning something new every day. Won't you join me?

GREAT NEWS!  I now have an Amazon Storefront!  If you ever want to purchase anything I'm showing you here, you can pop over to my shop and see what I've picked out for you! Click right here to visit.
 

It doesn't have to be done all at once.  It is a slow process in the works! C-ya next time!

Pin It!

Sunday, February 28, 2021

DIY Curtain Rod and Curtains - Farmhouse Style

Hello there! I hope you are doing well!  We are doing great!

During the deep freeze about two weeks ago, we practically lived in our living room, huddled around the gas fireplace!  We realized that our beautiful 100 year old windows with wavy glass do not seal well anymore.  We put up some curtains from our old house temporarily to keep the cold at bay and it helped a lot, so we decided that curtains would be a great idea in here!

This is my newest TikTok (ddcamp170) for how we made the DIY Curtain Rod and Curtains.  See my Instagram Reels for more how tos.

When we decided to do this thing in our living room, we got right to it, Hazel, not so much! Haha! She makes the photo look beautiful though! :)

This was how the three windows in our living room has looked since we moved in.  It was time for a change, dontcha think?

Here's our list of supplies:

(3) small 6" x 8" wooden corbels - $1.62 each at Home Depot

(1) 1-1/4” x 10’ Dowel Rod - $17.70 at Home Depot

(2) 9’ x 12’ Drop Cloths

(10) Clip Rings to hang the curtains

1-1/4" hole saw with drill

fine sand paper (220)

Weathered Oak Stain and Snow White Paint to achieve the look of the wood.

My honey took 3 cheap corbels from Home Depot (I don't see them online to link them for you) and clamped them all together.  He used his 1-1/4" hole saw to cut a half circle in the corbels.  This is where the rod will sit. I used some fine sandpaper and smoothed out the rough edges after he was done.

Next he positioned the corbels about 12 inches above the window.  We have 10 foot ceilings and I wanted the curtains to mostly fill up the wall.


He found the center of the window and placed the first corbel there.  He then measured the same distance on either end from the edge of the window to get the end corbel placements.  Me, I eyeball stuff, he measures, he's more of a perfectionist than I am.  Haha! :)  Next he laid the dowel rod up on the installed corbels and said. "there ya go"!

He marked the dowel rod for me so I'd know where to put it back after I added the clip rings and curtains.  At this point I was planning on leaving all the wood natural, but then it just looked too yellow against the wall color, so I decided to tone it down a bit.

I went out to the shed to see what we had in our stash.  I normally like using dark stains, but that was not going to work in this case, so I chose this weathered oak stain by Minwax.

The wood was still looking a bit too yellow even with the stain on there, so I white washed it a bit with some snow white acrylic paint.  I did not seal these pieces because we are not going to be touching them that much.

NOTE: My version of white washing the wood in this case was me swiping on some white paint, spreading it around a bit and then using a damp paper towel to smooth it out and tone it down.

Next, I tried on the drop cloth to see how it looked.  It looked really wrinkled, so I washed and dried the drop cloths and then folded one end down about 34” and clipped it in place. I used these clips.

I am loving the final look and so does my honey!  I don't know why we didn't this sooner!

Who's ready for Spring? I sure am because I'm over all this cold weather and dreariness!

Visit me over on Instagram @texasbluebingalow for more pretty views of my vintage decor! 

If you loved this idea and want to save it for later, be sure to pin it to your favorite Pinterest board.  I have a Pinterest board set up just for all things related to Farmhouse Decor and its called Farmhouse Decor Ideas and I'm pinning something new every day. Won't you join me?

GREAT NEWS!  I now have an Amazon Storefront!  If you ever want to purchase anything I'm showing you here, you can pop over to my shop and see what I've picked out for you! Click right here to visit.
 

It doesn't have to be done all at once.  It is a slow process in the works! C-ya next time!


Pin It!

Sunday, February 14, 2021

How I'm Using My Paper Bag Snowflakes for Winter

Hello there! How are you? I'm getting better and stronger every day. CLICK HERE for the details!

I wanted to share with you how I made these beautiful brown bag snowflakes or stars if you may. I also want to share with you how I'm still using them in my Winter decor.  They are not just for Christmas!I made three of my snowflakes back at Christmas time and used them around my tree in the dining room.  When I started putting away my Christmas decorations, I figured these paper stars are perfect to carry on through the winter as well, so I made two more.  Haha!

The wall over our fireplace is huge and sometimes I have trouble finding something large enough to use up there.  I started out with the three I had already.  Those are the three surrounding the mirror.  I felt like it needed more, so I made the two on the left of the original three.

SUPPLY LIST

Brown Paper Lunch Bags (9)

Hot Glue Gun and glue

Scissors

Hole Punch

Jute Twine (for hanging)

Count out 9 bags.  Make sure all the flaps are stacked in the same direction.  They should come out of the package like that, but who knows, maybe you drop the entire package on the floor and have to pick them up again!

 Who me? No, I did not! Yes I did! LOL!

Flap side up, start hot gluing all 9 bags together.  I use the low heat setting so it cools faster.  Be careful and not get glue at the top opening of the bag or your snowflake/star will not open up properly.  I found this out the hard way.

After you have all the bags glued together, this is where you will make the designs of your snowflake.  There is no right or wrong way to do this, just be careful not to cut too far into the bags or there will be parts that aren't attached to anything.  Cutting in too far causes your snowflake not too be sturdy.

When you get to the last bag, you will run your glue as you have been and then pull the top bag and the bottom bag together.  I put my hands on the inside of the bags to hold them for a minute until cool.  Now you are ready to hang them!  The two bags you just joined together will be the hanging point, or at least that's how I did it.  I used my hole punch in the center and then strung a long piece of twine through it.

For this wall treatment, I tucked my hanging twine behind them and hung them directly on the nail. (Find this beautiful eucalyptus garland HERE.)
I actually have no idea where I'm going to store these when warmer weather arrives, but I guess I'll figure that out layer on!

We are enjoying our paper snowflakes over the fireplace for Winter.  Did you make paper snowflakes this year?  If so, are you still showing them off?

Visit me over on Instagram @texasbluebingalow for more pretty views of my vintage holiday decor! 

If you loved this idea and want to save it for later, be sure to pin it to your favorite Pinterest board.  I have a Pinterest board set up just for all things related to Valentine's Day and its called Love Day and I'm pinning something new every day. Won't you join me?

GREAT NEWS!  I now have an Amazon Storefront!  If you ever want to purchase anything I'm showing you here, you can pop over to my shop and see what I've picked out for you! Click right here to visit.
 

It doesn't have to be done all at once.  It is a slow process in the works! C-ya next time!

Pin It!

Sunday, October 25, 2020

How I Painted a Faux Rug on Our Front Steps

Hello there!  How's you Fall treating you?  Ours is currently treating us with some Winter weather!  Weird for Texas, but it is very cold and rainy here right now!

I wanted to share with you how I painted a faux rug on our front steps.  I am seriously loving how it turned out!


It was LOTS of work, but so worth it in the end.  My rug is very simple and I'm sure you could really go elaborate if you wanted to, but for me, I chose easy for the first time around!


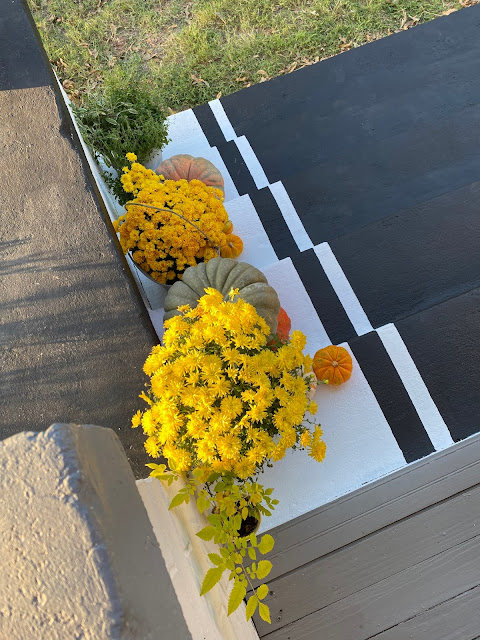
It makes a very dramatic change for sure.  I added bunches of Fall goodness, like pumpkins and mums to really make it special!


STEP 1: PAINTING THE BASE

I gave the steps a good cleaning and then painted the entire thing white.  I used a small roller brush to apply the paints.  Here's what paints I used:

1 Gal. Ultra Pure White Textured Low-Lustre Enamel Interior/Exterior Anti-Slip Porch and Patio Floor Paint

and a small can of Behr Ultra Stain Blocking Paint and Primer in One in the Exterior Flat Deep base and had them tint it in black. Sorry, I can't link it because I could not find it on the site.


It's already looking much better!  The paint that was on the steps was not for porches and was starting to chip off in places.  Also, the concrete is very old and pitted, so it took two heavy coats of paint with lots of tapping brush work to fill in all the cracks and holes.  I almost used the entire gallon of white paint.

STEP 2: MARKING GUIDE LINES

Later in the evening after the paint was really good dry, we marked the lines for the tape to go down each step.  Trust me, you need guide lines on a space this big!  This part is totally up to you on how you want your end result to look.  We measured in from each side, 18 inches and marked a line.


We laid the 2 inch painter's tape on the line we just made and then measured 3 inches over from the tape edge and made another line.  I knew I wanted my white stripes smaller than the black stripes.

This is how our pencil marks looked all the way down.  This was my guide to lay down the tape on either side.
 

STEP 3:  LAYING DOWN THE TAPE

The next day I got to taping off the stripes and got ready to paint.  Since the tape is 2 inches wide, this left my white stripes 2 inches wide and the black stripes 3 inches wide.

NOTE: You want to rub the edges of the tape down as best as you can, its a chore and makes your fingers sore, but its necessary to keep as much paint as you can from seeping under the tape.

WARNING: Paint still gets under the tape!

STEP 4:  PAINTING ON THE "RUG"

Again, I used a small sponge roller (a new one because the one from the white paint was destroyed by the rough concrete) to paint on the flat black paint.  I took a good two coats and then lots of touch ups with a sponge brush too.  The concrete is not smooth and has lots of pits and chips to fill.
 
STEP 5:  REMOVE PAINTER'S TAPE

After two heavy coats of paint, I let it completely dry and then I removed the painter's tape.

Oh wow! It looks awesome from way back here! Lol!
 
STEP 6: TOUCH UPS

Up close, not so much! No matter how careful you put down the tape, it's going to seep under, it just is, its rough concrete!  I used a small sponge brush and the white paint and touched up the line to make them sharper.  Don't drink lots of coffee before this task! lol!

STEP 7:  ADMIRE YOUR HANDY WORK - LOTS!

Now to let it dry really well overnight.  I was so excited about how it turned out that I bet I came outside 15 more times just to stare at it! Ha!


The next morning I added my pumpkins and mums to the stairs and snapped about 1 million pictures!  It looks so pretty!


The white steps make everything look so much brighter, don't you think?

It looks really nice from the street too!  For a week after I painted the steps, I would slow down and look at them as I drove by! Hahah!

Let me know what you think down below!  Would you try this type of project?  It's kinda tedious, but so worth the end results!  Thanks for stopping by to see me!

Visit me over on Instagram @texasbluebingalow for more pretty views of this space!

If you loved this idea and want to save it for later, be sure to pin it to your favorite Pinterest board.  I have a Pinterest board set up just for all things related to Halloween and its called Our 1922 Blue Bungalow and I'm pinning something new every day. Won't you join me?

GREAT NEWS!  I now have an Amazon Storefront!  If you ever want to purchase anything I'm showing you here, you can pop over to my shop and see what I've picked out for you! Click right here to visit.
 

It doesn't have to be done all at once.  It is a slow process in the works! C-ya next time!

Pin It!

Sunday, July 26, 2020

Say Hello to Our 1922 Blue Bungalow

Hello there!  We finally got moved, not totally moved, but moved! lol!  To be honest we are going to the storage units today to get more stuff, yes, I said UNITS!  We have lots of stuff!  We'll get there though!

True Story:
My honey surprised me by taking off work early on the day the house officially became available to us and moved our bedroom and the cats in before I got off work that night!  He even remembered the coffee maker and our clothes for work the next day too!  We stayed our very first night in our new home on July 10th!  I was completely surprised and had no idea he was planning any of this!  Needless to say, I cried!  He's the best!
So, some details.  She's a 1922 Craftsman Bungalow and she's a whopping 2, 022 square feet of vintage yumminess!  Yall, she'll be 100 years old in 2 years!
 
The above is actually the listing picture that I borrowed off the internet!  She's looking a bit different now that we've moved in!
Tah Dah! We've got the get all the flower beds and the lawn in ship shape, but that will just have to come with time I reckon!
The front porch is big and amazing and we love it!  I've added a few things of ours so far.
Look, she has a red front door! Cute huh!  I thought so!
This is our kitchen.  The previous owners must have loved dark colors because that's what we've got going on throughout the entire house.  I will be painting these cabinets for sure.  If you look closely you can see that they need a fresh coat of paint anyway.
This is the cute pantry door chalk art that was left here for us.  I actually admired the art when we toured the home and I was pleasantly surprised when we moved in that it was still here!
This is our living room.  It's huge!  More dark colors in here too.  I'll fix that soon!
I do love the built ins as well as the color too.  I'll leave that part, but the rest will get a makeover someday, especially the floors and fireplace bricks!  They are painted black too!  I think a lovely shade of white will be beautiful and will brighten it all up in here!
This is Hazel, one of three fluff balls that live with us.  They are our babies!  They are settling in pretty good so far.  We have been here since the 10th and the two fluffy people still walk around the house and cry.  Piper, the shy one, has mostly been hiding under our bed,  but now she's really venturing out to see what all she can get into! No picture of her, she hates having her picture taken! :)
This big dude is Zel.  He's the sweetest boy ever but is still crying about I don't even know what? I can't figure it out.  He's not normally not so verbal and very laid back.  They are getting better as the days go along though.  It'll get better and be ok. :)
We have an actual dining room now and this is where my old Hoosier hutch, Olivia lives.  She's already decked out of course!  It was like that little nook was made especially for her!
She holds lots of my vintage goodies and I change her look quite often!  Check me out on Instagram @ddcamp170 and you'll see her on there lots!  She's Insta-Famous! lol!
Our bedroom is also huge and of course since we've only lived in small houses, we don't have enough furniture to fill the room.  It makes our queen sized bed look so small in here.  Give me some time, I'll fill it up with some vintage goodies!
That's it for now.  Stay tuned for what all we're doing around here.  We've already done a really fun project outside.  Maybe I'll post about that next week.

ONLY A SHORT TIME LEFT TO DONATE!
Two Goats Candle Company candles are 100% vegan soy, have cotton wicks and smell delicious!  The Pumpkin Spice Latte is out NOW!

Now for the good part, shipping is FREE anywhere in the US! Purchase now through August 1, 2020 and Two Goats Candle Co will donate 20% of the sales made to the Black Lives Matter Global Network Foundation! Tell them DeeDee sent you! CLICK HERE to check it out! 


If you loved this idea and want to save it for later, be sure to pin it to your favorite Pinterest board.  I have a Pinterest board set up just for all things new house related and its called Our 1922 Blue Bungalow and I'm pinning something new every day. Won't you join me?


GREAT NEWS!  I now have an Amazon Storefront!  If you ever want to purchase anything I'm showing you here, you can pop over to my shop and see what I've picked out for you! Click right here to visit.

It doesn't have to be done all at once.  It is a slow process in the works! C-ya next time!


Pin It!
01 09 10