Showing posts with label Chalk Art. Show all posts

Sunday, July 7, 2019

Easy Summer Chalkboard Art

Do you have a chalkboard that you like to change the art on?  Where do you get your inspiration from?  I usually go to Pinterest and look at chalk art there.  I'm always drawn to the very simple look.
I have a box of white chalk and a box of colored chalk that I got at Walmart.  Sometimes I don't always have the colors I need, so I improvise.  Of course I can't copy exactly what I see on Pinterest, so my version usually has my own special touches to it.

You can see how I made my chalkboard here.
My chalkboard hangs over our coffee station so I try and have some cute little saying that fits the season we're in to greet us each morning.  You can see more of my chalk art here.
You can search different fonts on Pinterest or Google too if you need ideas for the writing part of your art.   When I was younger, I always enjoyed doodling on paper trying out different handwriting.  Back then it wasn't a thing like it is now.
There you have it, easy Summer chalkboard art!  I've changed it up again since I snapped these pictures! Ha, its so fun!

It doesn't have to be done all at once.  It is a slow process in the works! C-ya next time!


GREAT NEWS!  I now have an Amazon Storefront!  If you ever want to purchase anything I'm showing you here, you can pop over to my shop and see what I've picked out for you! Click right here to visit.

If you loved this idea and want to save it for later, be sure to pin it to your favorite Pinterest board.  I have a Pinterest board all set up just for Chalkboard ideas and I'm pinning something new every day. Won't you join me?


I'm Linking to:
These lovely and FUN parties!
Between Naps on the Porch
The Dedicated House  - (I was featured)
French Country Cottage

Pin It!

Sunday, January 31, 2016

Valentine Tic Tac Toe Chalkboard Art

This is the easiest and fastest chalkboard art I've ever done!  I'm pretty sure I created this one in less than 5 minutes.
My original thought was to fill the tic tac toe board with Xs and hearts.  I filled in the center column first and then added the X on the lower right hand corner and just when I was about to go up and add one more X to the upper left hand corner, I visualized "I heart U" in the top row, even better than Xs and hearts!
To create this design I grabbed a piece of pink chalk and broke it to the size I needed, about an inch long.  I used the side of the chalk and made my squares first and the rest I've already told you above! LOL!
See, I told you, so easy and fast!  I hope you try this chalkboard art for yourself, it really was fun and most of all EASY!
The chalkboard hangs in our kitchen and I normally keep some type of art on it that goes with whatever season or holiday we are in.  It's like therapy drawing on this chalkboard, you know,  like coloring when you were a kid?  I love to see what I can come up with.

Would you like to see more of my chalk art?  Look HERE.  You can also see a few more on my Instagram feed, please look me up, I am ddcamp170 on there.

NOTE: I'm having a really good clearance sale in my Etsy Shop right now.  Lots of Valentine's Day cards and goodies for very nice prices.  Please take a peek HERE.

It doesn't have to be done all at once.  It is a slow process in the works! C-ya next time!

I'm Linking to:
These lovely and FUN parties!
Between Naps on the Porch
DIY Home Sweet Home
We Call It Junkin

Pin It!

Sunday, November 23, 2014

Vintage Decorating - Give Thanks

My old hutch. She's chippy and cracked, but she's beautiful to me, especially this time of year! I love decorating my hutch for the Fall.  You see, she has the perfect colors for Fall decorating.
My honey gave this hutch to me when we first started dating.  A strange gift for your girlfriend?  Not to me, it was a perfect gift!  I think he was trying to win my heart over and he did a fine job of it for sure!
The rest of the goodies I use to decorate with, I've collected over the years.  For some reason around Thanksgiving time, I choose to decorate with kitchen or food related items.  It seems to go so well.
You can never have enough jello molds and this isn't even half of what I actually have! I can't resist them when I see them.  And you know what? I don't even like jello!  I think I have a problem!
I always set out my little Thanksgiving crew to watch over everything.  I've had these guys since my kiddos where little, now they are becoming vintage.
My Mama started this collection.  I saw the small platter at a swap meet and had to have it.  Why?  Because I remembered my Mama had a piece or two and its perfect coloring for my kitchen area.  The big platter there, that's Mama's, she shared with me!  She also gave me the coffee pot last year for Christmas, a find on Etsy.  I'm still looking for more pieces.
If you're a collector like me and you want to decorate vintage, all you have to do is shop your stash and you can change the decor up differently for every occasion.  Every holiday at our house has some vintage pizzaz thrown in the decor!  Best of all, its FREE to shop your home for decorations!
Another thing that's fun and easy is changing my chalkboard art.  I saw this beautiful pin on Pinterest and then tried my best to duplicate the writing.  Thank you for the inspiration Kate, your work is beautiful!

I love decorating for every holiday using my vintage collection, its so much fun and oh so frugal!  Do you decorate with your vintage collection?  If so, leave a comment because I'd love to see your collection too!

It doesn't have to be done all at once.  It is a slow process in the works! C-ya next time!

I'm Linking to:
These lovely and FUN parties!
Between Naps on the Porch
DIY Home Sweet Home
We Call It Junkin

Pin It!

Sunday, October 19, 2014

DIY Skeleton Vase

I have one last Halloween project before its too late!  So I had this giant vase that I found at a yard sale for $1! Woohoo!  I also had two strings of skeleton garland that I found at the dollar store.  I put them together and created a fun vase for Halloween.
The skeletons already came "hung" on the jute twine.  My honey thought I was mean for "hanging them"!  LOL!
This was the simplest craft of all time.  All I did was remove the skeletons from the cardboard they came on and wrap them around the vase and tie them on.  That's it!  I told you it was simple!
In the end I decided to use it as a candy holder, but really the possibilities are endless.  Just look what I did next.
 You could use it as a vase like I did here.  Pretty and spooky all at the same time huh?
To hide the ugly plastic stems of the fake flower bunches I grabbed a piece of corrugated card board, cut to size and popped it in the vase.
I'm really liking how this looks so it will probably be used as our centerpiece on our dining room table for next year's decorations.  Cute!
Well I'm off to create a few Fall-ish things to decorate for Thanksgiving.  What do you have planned for the rest of your Fall decor?  BTW, I found THIS vase on Pinterest after I had already made mine.  Hers is even cuter!  Love it!

It doesn't have to be done all at once.  It is a slow process in the works! C-ya next time!

I'm Linking to:
These lovely and FUN parties!
Between Naps on the Porch
DIY Home Sweet Home
We Call It Junkin

Pin It!

Sunday, April 20, 2014

Easter Cross Chalkboard Art

Happy Easter!
Now I have two chalkboards to decorate!  Woohoo!  This one is our latest find at a big antique mall near our home.  So much fun there, I gotta go back soon! Anyway, this was marked as being a 1940's schoolhouse chalkboard.  I'm not sure if that's true or not, but you can definitely tell its old. The actual chalkboard is so much smoother than my homemade one! Love it!
If you follow me on Instagram you may have seen my Valentine Day art I did on this chalkboard.  Since right after Valentine's its been sitting blank waiting for me to make it pretty again.  I decided to make it reflect the real reason we celebrate Easter!
Of course I scanned Pinterest for an idea and as usual, I found one HERE.  Unfortunately, there is no link to who actually created the original art, so I can't thank that person! :(  Here I start with a clean slate and my inspiration art.
Let's get started.  First I drew the base.  With this type of art, if you don't like it, wipe it away with a damp paper towel and start over.
Next was the top, bottom and sides.
Then I added the wording and some dots.
I never like my writing, but if you goof....just wipe it away and re-do it!
And a few more details.  It's all done in steps.  Slowly but surely.
A little filling in and add some lines.
Then I outlined the whole cross again.  It was a tight squeeze around the sides, but at this point, I wasn't starting over.  It's art, it doesn't have to be perfect!
Sometime I use a knife to sharpen my chalk for fine details.
Just keep going until you achieve the look you want.  I added a bit of extra shading in the body of the cross because I can never leave anything alone! LOL!
The shading is just a series of quick, light-handed dashes of chalk.
Now it's sitting in our kitchen by the coffee maker.  I love that its there each morning to greet me when I get my morning cup of Joe!

It doesn't have to be done all at once.  It is a slow process in the works! C-ya next time!

I'm Linking to:
These lovely and FUN parties!
Between Naps on the Porch
DIY Home Sweet Home

Pin It!

Sunday, March 23, 2014

RV Fridge Makeover with Chalk Paint

Our camper had a bit of damage to the fridge door.  It bugged me!  I fixed it...with chalk paint!  Everything is better with chalk paint, right?
I'm going to have so much fun keeping the camper themed chalk art on here!  There are so many cute ones out there too!
See the "T" shaped damage there? I think the previous owners must have taped something there and when removed, the tape took off the "wood grained" paper covering on the doors.  I fixed it in a flash using my chalk paint.
First, I taped off the parts I didn't want painted with some blue painter's tape.  Make sure you get a tight seal with your tape or you may have leaks where you don't want them.
Here's a trick I found on Pinterest.  Cover your paint tray with foil for faster clean up!  Love it!  I wish you could cover your brush and roller too! LOL!  I put down a drop cloth and wore gloves because I'm messy when I paint!
I applied the first coat of paint with the brush.  It didn't cover very well as you can see above.  I can still see the damage at this point too. Not good.
I applied the second coat of paint with the roller.  Much better this time but I can still see the damage!  Maybe one more coat?
All together I applied 3 coats of chalk paint, actually more over the damaged area, but if you look really hard, you can still see the damage a little bit. Darn it!  Well, its not glowing like it was before I started the process.
As directed, I waited 48 hours for the paint to cure and then I primed it by using a piece of white chalk.  Using the side of the chalk, rub the entire surface like you see above.  Remove the chalk with a dry cloth and you're on your way to creating your chalk art designs!
You can find lots of designs for chalk art on Pinterest.  I even have a board all about Chalky Love.  I also previously made a camping themed chalk board art HERE.
Since I created this art, we've gone camping with the kiddos.  Being that the fridge is right near the door, the art didn't fair too well.  Must be time for another design!

It doesn't have to be done all at once.  It is a slow process in the works! C-ya next time!

I'm Linking to:
These lovely and FUN parties!
Between Naps on the Porch
DIY Home Sweet Home

Pin It!

Sunday, October 6, 2013

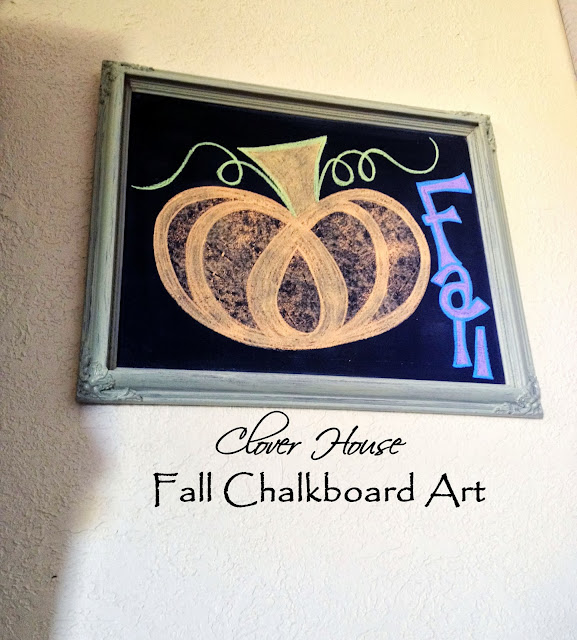
Chalkboard Art for Fall

Fall finally arrived this weekend in Texas. At one point yesterday, we were in the 40s with a bit of wind and rain! We even made our first fire of the season to celebrate the cool weather.
Notice anything different about my chalkboard? Well yes, I did change the art, but I also changed the frame color. How do you like it?  Even though I loved the red colored frame, it sort of stuck out like a sore thumb in our newly redecorated kitchen.  I think I like this shade of green better than the red!
I loved the look of THIS pumpkin so I tried my best to recreate it, but in color.  I used my crayola brand chalks again as I have with all my other chalk art designs.
It took me a while to get the pumpkin to look like I wanted it to, but as usual I really love how it turned out!  Just in case the crayola people are reading this now, could you make some Fall colored chalks? Alrighty! Thanks!
The purple and blue "Fall" is a bit out of the Fallish color scheme, but ya know, sometimes you just gotta use what you have available at the time! LOL!
On the pumpkin itself, after I went over the outside lines several hundred times, I laid the chalk on its side and used it to shade or color in the body of the pumpkin. Looks pretty cool!
Now I've got to do something to doll up those two white candles on top of the hutch.  Oh Pinterst...here I come!

It doesn't have to be done all at once.  It is a slow process in the works! C-ya next time!

I'm Linking to:

Sunday
Under the Table and Dreaming by Stephanie Lynn
, The Self Sufficient Home Acre , The Chicken Chick,  Sew Can Do 

Monday
Craft-O-Maniac, Between Naps on the Porch, DIY Home Sweet Home
, Keeping it  Simple , The Dedicated House, Skip to my Lou
Married Filing JointlyHome Coming,  The Princess and Her Cowboys

Tuesday
Not Just a Housewife, My Uncommon Slice of Suburbia,  Sugar Bee CraftsNew NostalgiaIt's your Life,   
Get Your Crap Together  ,  BeBetsy,  Fluster Buster  Confessions of a Plate Addict

Wednesday
Clean and Scentsible, Lady Behind the CurtainFamily Home and Life,  Ducks n a Row, 
VMG206.  Herrban MommaFamily Home & Life  ,Oh My! Creative

Thursday
Bloom,    The Taylor House.  52 Mantels,  Domesblissity,  Redfly Creations,   4 You With Love,  Sweet Haute
Artsy Fartsy Mama
 From My Front Porch To Yours

Friday 
Lil’ Luna,,  Tatertots and JelloFive Simple Things,  Craftionary,  Diana Rambles,    I Heart Nap Time

Saturday 
Angels HomesteadPositively Splendid,   Or So She Says Your Homebased Mom What's Cooking with Ruthie
Made From Pinterest

Pin It!
01 09 10