Showing posts with label Master Bathroom. Show all posts

Sunday, April 17, 2022

1954 Bathroom Makeover Using Paint

Happy Easter!  I hope you are all doing well!

I finally have my bathroom the way I want it, I think! Lol!  There's actually still more to do.

Since before I moved in I knew I was going to change the very dark paint in my master bathroom.

Do you adore my original 1954 tiles like me or is it a NOPE for you?

This picture is the end result of all my efforts to make my bathroom brighter and happier.  It's been a journey for sure.  I tried peel and stick wallpaper that would not adhere to the walls.  Why you ask?  I believe its because the wall texture is too rough and porous to for the paper to get a good grip.

Look how pretty this wallpaper is!  I really loved it!  Find it right here.

I had originally only ordered one roll. I loved it so much that I ordered two more rolls to finish the job!  I was so sad when I came home from work the next day to find it peeling off the wall!

At first I thought maybe I had over handled this piece of paper and it ruined the sticky.  Nope!  The next day it was another piece and another piece and well, you get the picture.  I was so sad that I sent the rest of the paper back.

NOTE: The wallpaper is very nice quality and I do not believe it was any fault of the paper at all.

Back to the awful dark, light absorbing paint on the walls for another month.  Finally I went out to the garage and went through the paint stash that the previous owners left behind.  I found white paint!  Only bad thing was, it was not a primer and paint in one, which is what I really like using because its normally two coats and done!

It took me the better part of a day to get 68 thousand coats (3 coats) of paint with LOTS of touch ups to get it looking like I have it today!  I LOVE IT!  It's so bright in there now.


 See more videos on Instagram.


No really, I love it!  To finish off the fresh paint, I ran a bead of caulk along where the tile meets the paint.  Perfection!

I used my one leftover panel from my bedroom curtains to make a matching curtain for the bathroom window. See the details about my bedroom right here.


Zoomed in on the window ledge to my vintage kitties and mouse from my childhood.  That's all!  Or is it?  I'm contemplating painting the ceiling a very pale pink too!  Whatcha think about that?

See more pretty pictures over on my Instagram page.

If you loved any of these ideas and want to save them for later, be sure to pin it to your favorite Pinterest board.  I have a Pinterest board set up for all things in my bedroom and its called Master Bedroom Ideas I Love! I'm pinning something new on Pinterest every day. Won't you join me?

***I am a participant in the Amazon Services LLC Associates Program, an affiliate advertising program designed to provide a means for me to earn fees by linking to Amazon.com and affiliated sites.***


Pin It!

Sunday, October 6, 2019

Tiling Two Bathrooms in One Day

Yes, you read that right, we tiled two bathrooms in one day.  No, obviously they were not complete from start to finish in one day, but the actual laying of the tiles was done all in one day!  To say the least, we were exhausted by the end of that day! Whew!
We've previously done lots of work to both bathrooms, but we've never got around to redoing the floors.  Now we have!  This is the master bathroom, my favorite!
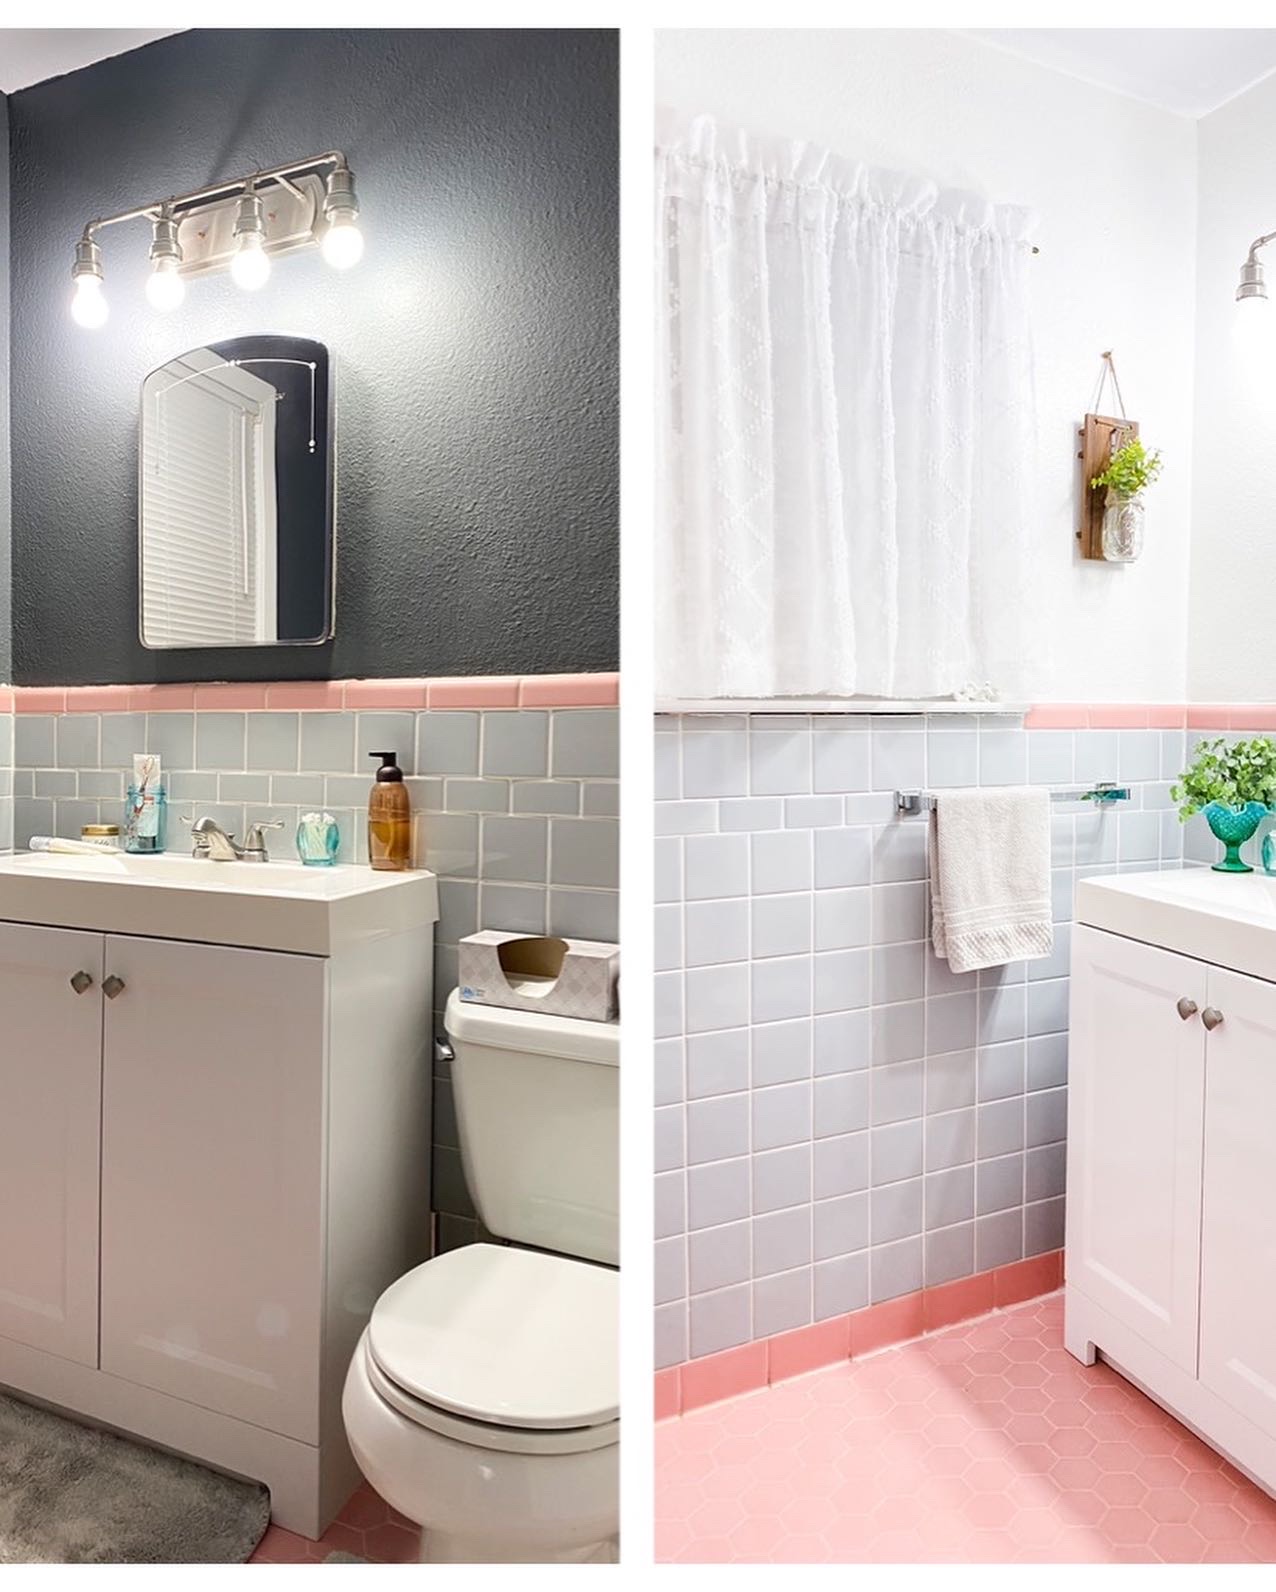
Since installing the tile floor, it is completely beautiful, well, I think so anyway!
We started out with this lovely 1980's linoleum flooring.  Isn't she a beaut! Nope? Yeah, me too! I hated that ugly flooring, seriously!
The linoleum was a slight booger bear to remove.  My husband took a scraper to it to try and make it a faster job.  There were spots that were curling up around the edges, but then there were spots that were literally stuck like they were adhered with super glue! Crazy!
Almost there!  You can see the left over glue remnants there along the edges.  There was also this super fine dust under there. I guess the actual backing of the linoleum was breaking down after so many years of traffic.
This flooring scraper tool is the best thing to have if you have old linoleum to take up off your floors.  It will save your knees and back in the long run.

Now on to the guest bathroom.  This is what it originally looked like when we moved in.  Those yellow walls were very alarming and that vinyl base board is such an awful thing to have in you home bathroom!  Isn't that stuff for public restrooms?  This bathroom had cheap peel and stick tiles which were only slightly better than the linoleum in the other bathroom, but at least it wasn't that ugly!

Previously we removed the vinyl base board stuff and it made an extremely awful mess of the sheet rock in some spots, so we knew we'd have to use a tall base board to cover all that up in the end.  But in the meanwhile, I updated the wall color to a beautiful shade of gray.  Much better!  We lived with the room like this for quite some time and I was ok with it.
Back to current days, together we removed the peel and stick tiles.  It didn't take long at all, but in the end it was an extremely sticky situation to walk on.

TIP: My honey got the idea to use a small amount of grout powder that we had left over from the entry hall tile job (you can see that here) to sprinkle and spread over the sticky floor.  We spread it around with our patio broom and then used the shop vac to remove the remaining powder.  It worked like a champ, no more sticky floor to work on!
Ok, next we mixed up the mortar to lay the tiles.  We used a 5 gallon bucket and a mortar mixer attached to our power drill to mix it.  The mortar mixer is a must, you need it!  We used one bag (seen below) of mortar mix to do both bathrooms.

Click right here to see the mortar, we got ours at Home Depot.

NOTE: We used gray mortar because we were using a gray grout, but if you use a light colored grout, you will want to use white mortar.


We used 6" x 24" wood look Premium Ceramic Tiles in the color Capel Ash from Home Depot.  They were a discontinued item so we bought all they had on hand.  Since we've done other tile jobs in our home, we had everything we needed tool wise.  You will either need to purchase a tile cutting machine or rent one, because there is no doubt you will have to cut tiles to fit your space.  We have a wet tile saw, but you can use a manual cutting device as well.  The flooring trowel is also a must when tiling and we used 1/8" tile spacers to get a nice even space in between each tile.
Now this sets for 24 hours before we add the grout.  On to the master bathroom!

NOTE: If by chance you get overzealous on the mortar and it comes up through your grout lines, take a flat head screw driver and remove it before it completely sets.  You'll save yourself lots of headache if you do so!  Also, don't forget to remove your spacers after about 30 minutes of sitting.
Before you start your grouting job, you will need at least two large buckets of clean water, grout sponges, a rubber grout float and knee pads! Don't leave off the knee pads!

Here's the sanded grout we used, its from Home Depot.
After all the grout is in, we let it sit for about 15 minutes and then start the sponge clean up process.  Make sure you are using a damp sponge and not a dripping wet sponge.  You don't want too much excess water going on your freshly grouted tile.
Here it is with the all new floor and beautiful baseboards! Now doesn't that look nice? Yes it does, if I do say so myself!
I don't have all the step by step pictures of the master bathroom because we were trying to hurry before our mortar went too dry, so I was helping too and couldn't take the time to snap pictures.  Basically it was the same steps as above for this room.
Here's a little flash back of when I painted over the bright blinding yellow to a softer prettier gray.
And, the previous owners had a leak in the a/c unit (its in the attic) and never painted the ceiling, so I did that too!
I also gave the door a nice coat of white paint and painted the hardware while I was at it too.
Tah Dah! Isn't it pretty? I think so too!  A beautiful tiled floor makes all the difference in a bathroom, so even though its exhausting work, its always worth it in the end!

Click here if you want to see what else we've done to the master bathroom.

If you loved this idea and want to save it for later, be sure to pin it to your favorite Pinterest board.  I have a Pinterest board all set up just for Bathroom Beauty and I'm pinning something new every day. Won't you join me?

GREAT NEWS!  I now have an Amazon Storefront!  If you ever want to purchase anything I'm showing you here, you can pop over to my shop and see what I've picked out for you! Click right here to visit.


It doesn't have to be done all at once.  It is a slow process in the works! C-ya next time!


I'm Linking to:
These lovely and FUN parties!
Between Naps on the Porch
The Dedicated House  - (I was featured)
French Country Cottage
Skip to my Lou
The Self Sufficient Home Acre

Pin It!

Sunday, October 28, 2018

$5 Bathroom Vanity Light Makeover

On a budget?  We are too!  Sometimes you want a new look but its not in the budget to buy all new items.  How about a little makeover on something you already have?  Yes please!  This lighting makeover was easy and just what our master bathroom needed!

Disclaimer:  All of my pictures didn't turn out properly. Grrrrr!  I apologize for that, but I think I'll be able to explain so that you can try this makeover too!
The lighting in our master bathroom was stuck in the 80's.  It was that shiny brassy look.  Yuck! I didn't care for it at all!  This little makeover is going to bring it into the here and now.  It cost me the price of a can of spray paint which was about $5.  Some day I'd like to have new fixtures in here, but I'll take the $5 expense over the prices of new lighting fixtures for now.
This is a photo I found on Google.  This is what our fixtures used to look like before the makeover.
Ok, grabbing your supplies, you will be using spray paints, this is the easiest technique for this application.  You'll need a metal primer (any color is fine as long as its for metal) then you will need a paint color of your choosing.  I already had the primer on hand but I went to Lowe's and I chose an Oil Rubbed Bronze color in the textured version as my color.
To get the paint to adhere to the metal fixture, you will need to rough up the surface a bit.  I used my mouse sander with some 120 grit sand paper.  If you don't have a hand sander you can just grab a small piece of 120 grit paper and hand sand the surface area.
Again, I apologize for the blurry pictures!  Some of them were so bad I couldn't use them.  Gosh, what kind of blogger am I anyway! :)

Of course, first you will take the fixture down from the wall or ceiling and disassemble it into all the individual pieces.  Using your sand paper, lightly sand the shiny finish from your fixture.  You only want to remove the shine, no need to remove all the color. 
After you have lightly sanded all your pieces, wipe the dust off best you can.  I use a damp cloth to get all the dust off and then let them stand for a few minutes to make sure they are completely dry before painting.
Next, lay all the pieces out on cardboard or plastic spaced out so you will be able to get the spray paint on all sides. Spray all the pieces with metal primer first. Let dry completely.
Careful moving each piece before its completely dry because you could drop it and end up with this mess! Gosh!

Some pieces are harder to paint than others, so take your time and be sure to cover all the areas.

Repeat the steps above with the paint color of your choice.  Let all the pieces dry the directed time before you reassemble your "new" light fixture.
My honey hung them back over each vanity then we added some cost saving LED light bulbs and we had new light fixtures!  No more ugly shiny brass!

We've done so much more in our master bathroom since then and if you'd like to, you can read about those projects by clicking right here.

P.S. Let me know if you're interested in doTerra holiday items because I can help you out! Click right here to see the Holiday Gifts doTerra offers.  I personally want one of everything! :)

It doesn't have to be done all at once.  It is a slow process in the works! C-ya next time!

I'm Linking to:
These lovely and FUN parties!
Between Naps on the Porch
The Dedicated House  - (I was featured)

Pin It!

Sunday, July 29, 2018

DIY Master Bathroom Vanity

Bathroom vanities can be an expensive project.  When we first moved in, we weren't planning on remodeling the MB vanities right away, but we were forced to do so due to a leak of one of the faucets under the sink.  The faucet had to be replaced, so one thing led to this project!  We needed to save money while making the needed repairs, so we went the DIY route of course.

I have posted about this project a really long time ago in a 4 part series, but it has had such a great response on Pinterest that I thought I would post about it again in a shorter more condensed version of the first series.
This is actually one of the first projects we ever did in our home.   This is my honey's side of the bathroom back in June of 2011.  I've changed the decor a bit since then. lol! :)
Here's how the vanities looked when we moved in.  Not terribly awful with its shell shaped sink in faux blue swirled marble top, but not so much up to date either!  Surely not our style!  That faucet there was the culprit and reason for the whole makeover.

NOTE:  You can see my method of painting our cabinets by clicking right here.

Speaking of shell shaped sinks, look at this beauty!  Wow! So pretty!
We like the rustic but new look.  Does that make sense?  When we were trying to figure out what route to take in building the vanity top, my honey had the idea to "rough up" the boards a bit to make the wood look old and used, like an old barn floor would look.  We started out with (4) 2 x 6 boards and used some chain and other tools to beat them up a bit.
We may have went a little overboard and definitely took out our aggression on these poor boards, but this is what they looked like when we were done.  We used our hand sander and smoothed down all the rough areas so it would be safe for us to use daily.
Its hard to tell in this picture, but the four big boards were all held together using 2 x 4s glued and screwed on to the already glued together 2 x 6s.  We use gorilla wood glue for all our wood working projects and it did a fine job sealing any gaps there may have been in between each of the 2 x 6s.
To finish the vanity tops so they would last forever, I applied one coat of Minwax Dark Walnut stain, then lightly sanded it with a very fine 220 sand paper.  Lastly I applied two coats of Minwax Polyurethane to seal the wood and guard against any water damage. We've been using these counter tops since 2011 and its test of "water-proof-ness" has very much been tried and still passes with flying colors.
We used a standard white bowl sink.  I love the crisp white on the dark wood.  Its just so fresh and clean looking to me.  At the time, these sinks were the most inexpensive ones we could find locally and they have held up so nicely.  Even now, right after a good scrubbing, they still look new.
We chose to use the oil rubbed bronze finish for our fixtures in our bathroom so of course we picked out some faucets to match.  This faucet wasn't really made for a bowl sink, but we made it work and they are still working great today!
The sinks were added very easily with some clear silicone for bathrooms.  He added a nice bead along the bottom and then after he placed the sink in its spot, he made one bead around the bottom edge to seal out any water that may try and get through.
You may have noticed the wall was a bit damaged after we removed the lovely blue swirl marble back splash so we added a little natural stone tile to create a fresh and clean look again.
Lovely and oh so rustic looking.  Perfect for our little farmhouse theme in our home we've going on.
We've done so much more in our master bathroom since the vanity project and if you'd like to, you can read about those projects by clicking right here.

I have listed all the original post about the processes of the vanity down below if you'd like to see more pictures and get more details.

Master Vanity Part 1 - Click here.
Master Vanity Part 2 - Click here.
Master Vanity Part 3 - Click here. 
Master Vanity Part 4 - Click here.
Painting Our Cabinets - Click here.

It doesn't have to be done all at once.  It is a slow process in the works! C-ya next time!
 

Pin It!
01 09 10