Showing posts with label crafts. Show all posts

Wednesday, November 29, 2023

Spice Up Your Holidays: DIY Cinnamon Christmas Ornaments

Hey there friends! You may have already noticed that Christmas time is my very favorite and I thoroughly enjoy all the things, including decorating and crafting during the holidays. Let's talk about a fun and easy craft that the kiddos can get in on too!

The holiday season is the perfect time to infuse your home with warmth and festive cheer. One delightful way to do this is by making your own cinnamon Christmas ornaments. Not only do these ornaments add a rustic charm to your tree, but they also fill your home with the nostalgic scent of cinnamon. Join me on a festive crafting journey as we explore how to make these charming and fragrant decorations for the most wonderful time of the year.

NOTE: Do you have cats like me? The tree that gets to hold these little jewels of cinnamon will NOT be bothered by your cats! Cats think the scent is awful and will stay away!


Ingredients and Materials:

Before you embark on your cinnamon ornament adventure, gather the following ingredients and materials:

Materials:

  1. Rolling pin
  2. Cookie cutters in festive shapes (stars, hearts, gingerbread men, etc.)
  3. Drinking straw
  4. Baking sheet
  5. Parchment paper
  6. Twine or festive ribbon
  7. Ingredients:

    1. 1 cup ground cinnamon
    2. 1 cup applesauce
    3. 2 tablespoon white glue


    4. Mixing the Dough:
      • In a mixing bowl, combine the ground cinnamon, applesauce and white glue.
      • If you want to ensure a sturdier ornament, don't forget to add the two tablespoons of white glue to the mixture and thoroughly mix.
      • Stir until you achieve a dough-like consistency. If the mixture is too wet, add more cinnamon; if it's too dry, add a bit more applesauce.


      • Rolling and Cutting:
        • Preheat your oven to 200°F (93°C).
        • Dust your work surface with cinnamon to prevent sticking.
        • Roll out the cinnamon dough to a thickness of about 1/4 inch using a rolling pin.

      • Use festive cookie cutters to cut out shapes from the dough.

      • Place the ornaments on a parchment paper-lined baking sheet.

      • Creating Hanging Holes:

        • Use a drinking straw to create a small hole near the top of each ornament. This is where you'll thread the twine or ribbon later.

      • Baking:

        • Bake in the preheated oven for 2-3 hours or until the ornaments are completely dry and hard.
            1. Decorating (Optional):

              • Once the ornaments have cooled, you can leave them as is for a natural, rustic look, or get creative with paint for added flair.
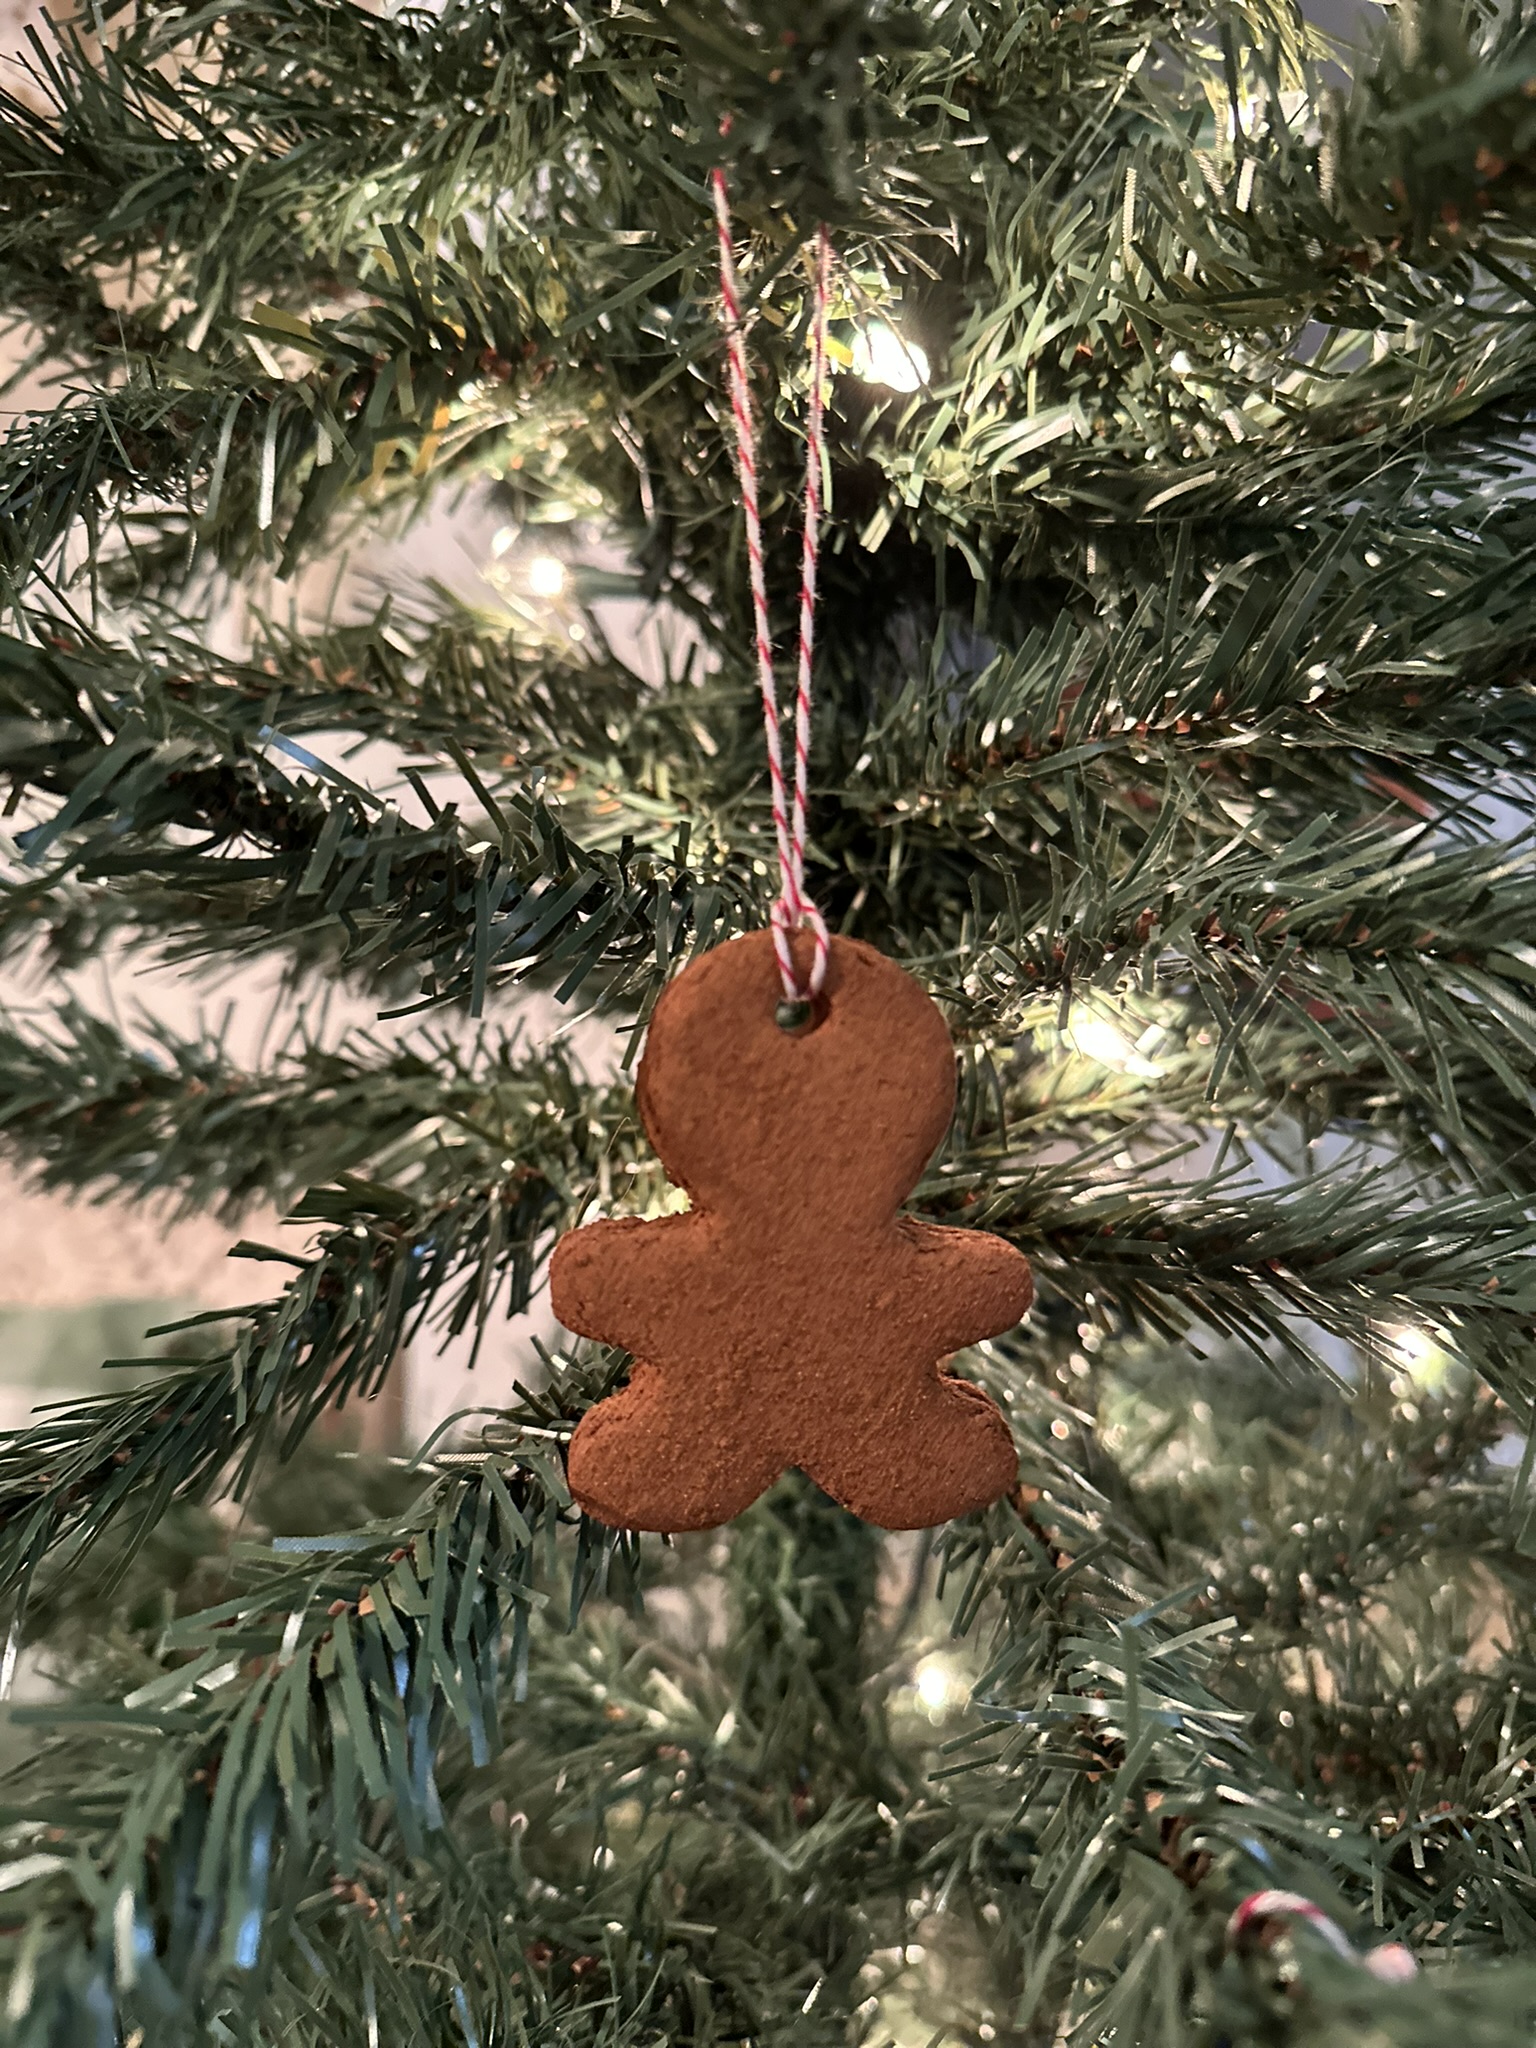
              • Use a small paintbrush to add details or paint the edges of the ornaments with metallic colors for a festive touch. As you can see, I did not decorate mine.
            2. Adding the Finishing Touch:

              • Thread twine or festive ribbon through the hole you created earlier, tying a knot at the top for hanging.


              • Making cinnamon Christmas ornaments is not only a delightful crafting activity but also a sensory experience that will fill your home with the cozy scent of the holidays. Get creative with shapes and decorations, involve friends and family, and enjoy the process of adding a personal touch to your festive decor. These charming ornaments will not only adorn your tree but also become cherished keepsakes, bringing the spirit of the season to your home year after year. Happy crafting!

              • **If you don't have time to make your own, check out my Etsy shop here.

              • For more fun Christmas ideas, go visit my Instagram. I post every single day. Find me @TexasBlueBunglaow on Instagram.

              • If you loved any of these ideas and want to save them for later, be sure to pin it to your favorite Pinterest board.  I have a Pinterest board set up for all kinds of wonderful Christmas ideas and it's called Cool Yule.  I'm pinning something new on Pinterest every day. Won't you join me? 

              • ***I am a participant in the Amazon Services LLC Associates Program, an affiliate advertising program designed to provide a means for me to earn fees by linking to Amazon.com and affiliated sites.**

Pin It!

Sunday, February 14, 2021

How I'm Using My Paper Bag Snowflakes for Winter

Hello there! How are you? I'm getting better and stronger every day. CLICK HERE for the details!

I wanted to share with you how I made these beautiful brown bag snowflakes or stars if you may. I also want to share with you how I'm still using them in my Winter decor.  They are not just for Christmas!I made three of my snowflakes back at Christmas time and used them around my tree in the dining room.  When I started putting away my Christmas decorations, I figured these paper stars are perfect to carry on through the winter as well, so I made two more.  Haha!

The wall over our fireplace is huge and sometimes I have trouble finding something large enough to use up there.  I started out with the three I had already.  Those are the three surrounding the mirror.  I felt like it needed more, so I made the two on the left of the original three.

SUPPLY LIST

Brown Paper Lunch Bags (9)

Hot Glue Gun and glue

Scissors

Hole Punch

Jute Twine (for hanging)

Count out 9 bags.  Make sure all the flaps are stacked in the same direction.  They should come out of the package like that, but who knows, maybe you drop the entire package on the floor and have to pick them up again!

 Who me? No, I did not! Yes I did! LOL!

Flap side up, start hot gluing all 9 bags together.  I use the low heat setting so it cools faster.  Be careful and not get glue at the top opening of the bag or your snowflake/star will not open up properly.  I found this out the hard way.

After you have all the bags glued together, this is where you will make the designs of your snowflake.  There is no right or wrong way to do this, just be careful not to cut too far into the bags or there will be parts that aren't attached to anything.  Cutting in too far causes your snowflake not too be sturdy.

When you get to the last bag, you will run your glue as you have been and then pull the top bag and the bottom bag together.  I put my hands on the inside of the bags to hold them for a minute until cool.  Now you are ready to hang them!  The two bags you just joined together will be the hanging point, or at least that's how I did it.  I used my hole punch in the center and then strung a long piece of twine through it.

For this wall treatment, I tucked my hanging twine behind them and hung them directly on the nail. (Find this beautiful eucalyptus garland HERE.)
I actually have no idea where I'm going to store these when warmer weather arrives, but I guess I'll figure that out layer on!

We are enjoying our paper snowflakes over the fireplace for Winter.  Did you make paper snowflakes this year?  If so, are you still showing them off?

Visit me over on Instagram @texasbluebingalow for more pretty views of my vintage holiday decor! 

If you loved this idea and want to save it for later, be sure to pin it to your favorite Pinterest board.  I have a Pinterest board set up just for all things related to Valentine's Day and its called Love Day and I'm pinning something new every day. Won't you join me?

GREAT NEWS!  I now have an Amazon Storefront!  If you ever want to purchase anything I'm showing you here, you can pop over to my shop and see what I've picked out for you! Click right here to visit.
 

It doesn't have to be done all at once.  It is a slow process in the works! C-ya next time!

Pin It!

Sunday, April 12, 2020

Easy Book Page Garland

Happy Easter!  I hope you are all well and happy on this beautiful day!  My honey and I will be enjoying our Easter feast alone this year.  We will miss our family, but we also know its for the best at this time in our world! E V E R Y O N E has to do their part or this thing will continue on and never end! #stayhome

I have something fun and easy (as usual) for you to make.  As you can see, I'm showing you this garland with my Easter decor, but you can use this book page garland all year long. I'm going to!
On to the fun stuff!  We all love fun stuff don't we?  I certainly do!  By the way, this is Hazel (sleeping) and Zel, they are two of my sweet babies.  This old window is fun to decorate for all the occasions and one thing I try and incorporate is a garland.  I had this one there for the longest time but it was time for a change.

Side note, this sofa cover is amazing and you can find it right here!  It's amazingly soft and I want one in all the colors now!

Also, How to Make a Vintage Hanging Planter - Seen on either side of the old window.

Pillow covers are from Three Little Mommas - find them HERE.
This garland is large and full and makes a bold statement.  I cant wait to have a mantle to decorate again some day (we're renting here with no fireplace) so I can make a really long one to hang up for a grand focal point!
You will need just a few things for your garland.  Keep in mind that the size of your book pages will create a large or small end result. The number of pages will depend on how long you want your garland to be.

Old Book Pages - mine are 6 1/4" x 9 1/2" and out of an old law book
Scissors
Hole Punch
Jute Twine
STEP 1: Tear out a stack of pages
STEP 2: Cut your pages in half
Now you should have a pretty nice stack of halfed pages to work with.  I like to leave on the rough edges because I like the look, feel free to cut those off if it bothers you.
STEP 3: Fold your half page slightly wonky like you see here.
I use the assembly line method, so I stack up a bunch before I go on to the next step.
STEP 4: Punch a hole in the center (ish) of your folded book page.
STEP 5: Slightly crumple each page.  This creates the fullness of your garland.
STEP 6: Cut your jute twine to the length (leaving enough for hanging loops on each end) to fit where you'll be hanging it and add the book pages onto the twine. I'm a weirdo, so I placed all of my book pages in the same direction (small folded piece up) but there is no certain way to string them on the twine, just get them on there the best way you can.
Keep adding book pages until you reach the desired length to fit your space.
Lastly, hang, fluff and enjoy!  You can find my book page wreath you see above right here.

If you loved this idea and want to save it for later, be sure to pin it to your favorite Pinterest board.  I have a Pinterest board set up just for all things crafty called I love IT and all kinds of other fun stuff and, I'm pinning something new every day. Won't you join me?

GREAT NEWS!  I now have an Amazon Storefront!  If you ever want to purchase anything I'm showing you here, you can pop over to my shop and see what I've picked out for you! Click right here to visit. You can find this bedspread in the "For Our Home" section.

It doesn't have to be done all at once.  It is a slow process in the works! C-ya next time!


Pin It!

Sunday, April 5, 2020

How to Make Clothespin Carrots

Hello there, how are you making it through all of this shelter in place and social distancing?  My hubs and I are still working so its not as bad for us.  We miss eating out on Friday's and thrift shopping, but other than that, it's life as usual for us.

I have a fun and easy craft for you today!  Isn't this the cutest idea?! I saw these "carrots" on Pinterest and had to make some of my own! They are the best little Farmhouse Decor pieces you need to add to your Easter vignettes or tiered tray displays or maybe all together in a cute Easter basket like I have here!
This sweet bunny likes them too!  Let me show you how I made them.  You may already have the items on hand and if not, there are just a few things you'll need.
You will need the following items to recreate my clothespin carrots:

Wooden clothespins (remove the spring)
Green yarn for the tops
Orange Paint
Hot Glue Gun and Glue set on low (Tacky Glue can be used as well)
STEP 1: Remove the springs from your clothespins.
STEP 2: Lay your naked pins out separately on a piece of wood or cardboard and paint with orange paint.  I did not paint the flat sides because they will not show in the end.
STEP 3: Cut yarn for the tops.  I cut mine slightly longer than the pins. I used 8 strands for each of my carrots, but use as many as you like for the fullness you want.
STEP 4: Glue your pins together.
NOTE: Like me, DO NOT make the mistake of gluing the yarn inside the pin, it doesn't end well and makes the pin not want to stay together and look nice.
I found by experimenting that if you glue your pins together first, then add the yarn to the top, it looks much nicer!
STEP 5: Glue 4 pieces of yarn directly on top, 2 pieces on the right side and 2 pieces on the left side.
STEP 6: Wrap one single strand of yarn from the first notch up to the top like you see here. Glue in place as you wrap.
STEP 7: Unravel the yarn for a fuller look. My yarn had 4 strands to each piece and gave this look at the end.  This is totally optional of course.
Now your ready to display them! You could make a grouping like this or maybe even use them on your place setting at your table for Easter or Spring! Have fun!
This Easter basket was my oldest son's first Easter basket for his first Easter.  That sweet bunny was a gift from my sweet step Mom a really long time ago when my boys were young, he's a set of three cuties and I love them!

If you loved this idea and want to save it for later, be sure to pin it to your favorite Pinterest board.  I have a Pinterest board set up just for all things crafty called I love IT and all kinds of other fun stuff and, I'm pinning something new every day. Won't you join me?

GREAT NEWS!  I now have an Amazon Storefront!  If you ever want to purchase anything I'm showing you here, you can pop over to my shop and see what I've picked out for you! Click right here to visit. You can find this bedspread in the "For Our Home" section.

It doesn't have to be done all at once.  It is a slow process in the works! C-ya next time!


Pin It!
01 09 10