Showing posts with label Mantel Scape; Decorating. Show all posts

Sunday, December 3, 2017

How to Create a Gorgeous Holiday Mantel on the Cheap!

You don't have to spend a lot on decorations to make your home look beautiful this holiday!  Try shopping your own home to see what you have before spending loads of money on holiday stuff!
I spent a total of $6 on our mantel this year.  I bought the two candles at the Dollar General on Black Friday for $2.50 each and I found the "Merry Christmas" sign at the Dollar Tree for $1! Bargain!  All the other items you see here I have collected over the years.
I knew I wanted a lit garland on the mantel, so I went to our Christmas goodies to see what we had.  I grabbed some twinkle lights and faux garland.  The garland was really long so I folded it in half and twisted it a bit to hold it.  Next I wrapped the lights around it to hold it all together.  Our mantle is a little over 5 foot long, so this was just right.
Next I shopped my stash of holiday picks.  I've saved these from fresh wreaths we've had in the past and my Mama saves things for me too. *wink*  I also went to my craft supplies and grabbed a ribbon and some baker's twine.  You'll see why shortly.

I placed the garland with lights up on the mantel and made sure the lights still worked after I "man-handled" them to get them wrapped up on the garland. Next I added my sign. Looking cute so far!
Then I added my sweet little bargain candles that smell delicious!  I just sat them in a vintage plate for added charm and protection.
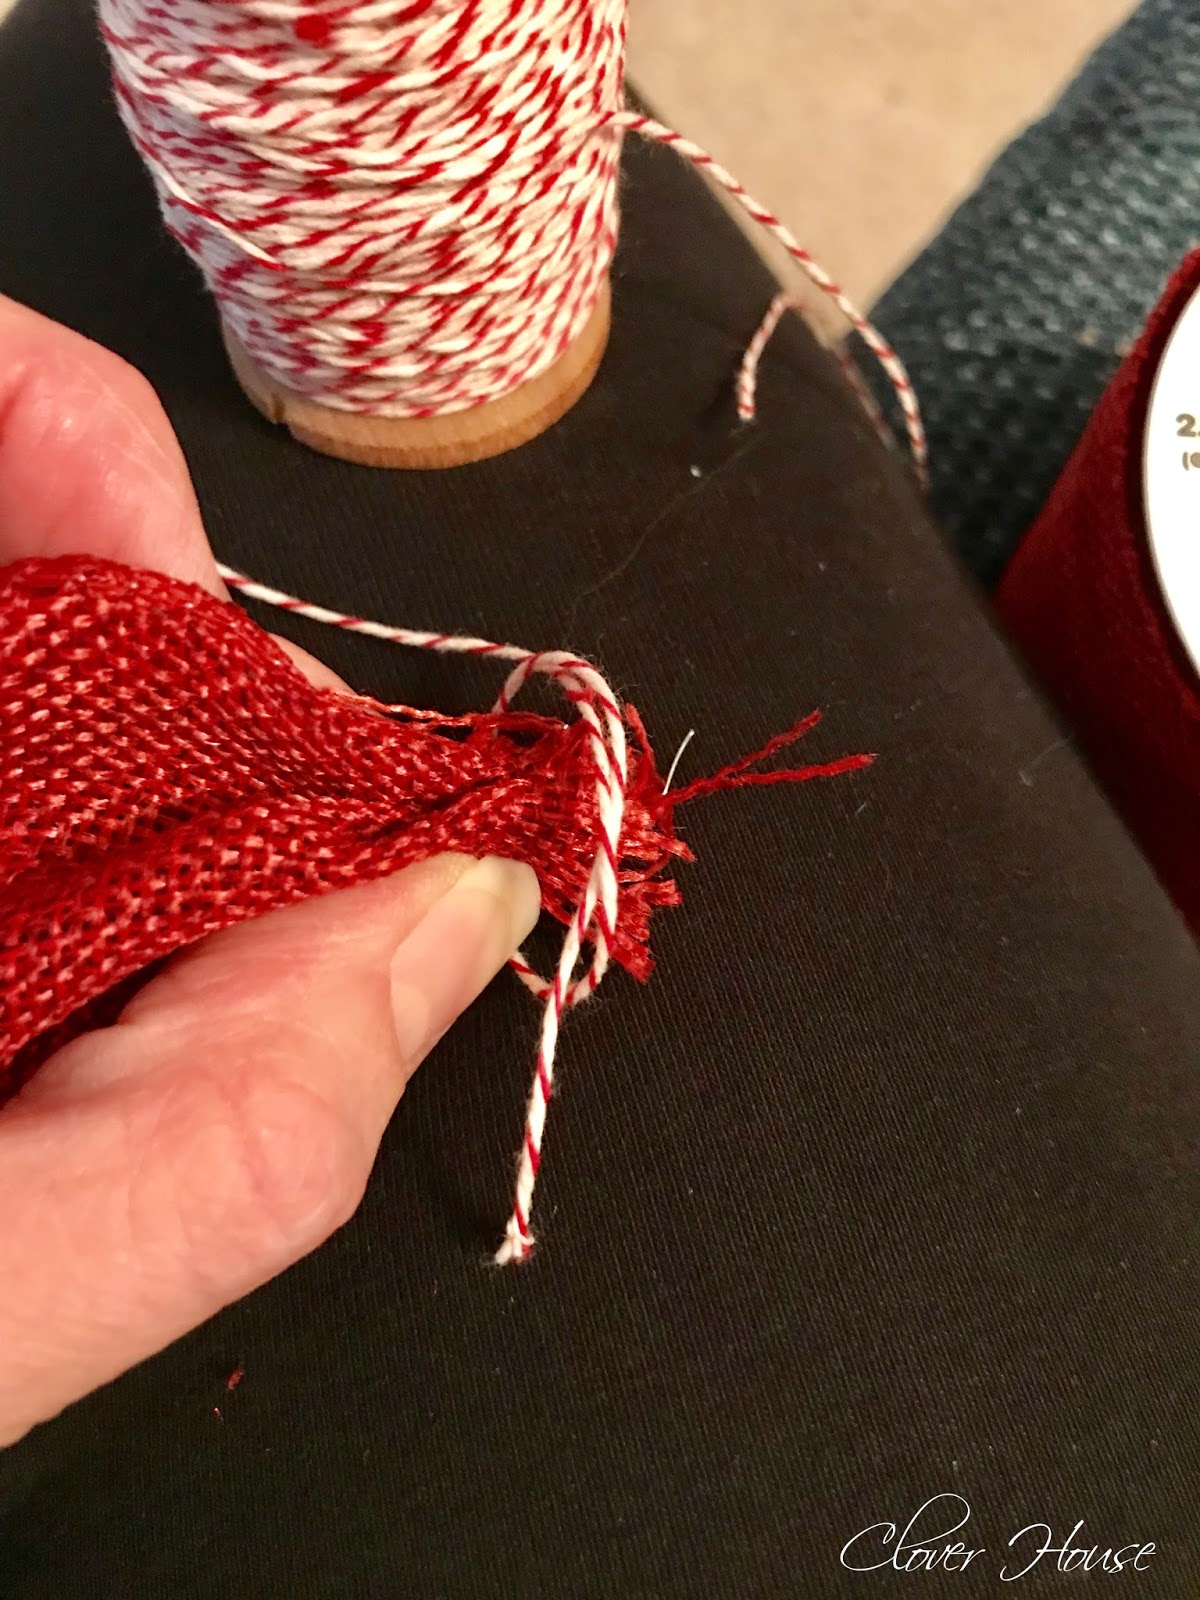
Now to decorate the garland.  I used this method of making little poofs so I didn't waste too much of my ribbon.  Cut your ribbon to size (depends on what look you want) and then tie the end with a small piece of twine to hold it all together.
Now you're ready to tuck them in here and there and everywhere.
I just placed them around the garland and then stepped back to see if it looked even to me. Anything YOU like is fine!
Next I just grabbed my floral holiday picks and started tucking them in here and there.  Again, no right or wrong here, just make it look the way you want it to.
I tied a regular bow for the center of the mantel and I added it right above the sign.  I made mine with long streamers so they could come down and tie the sign in to the whole set up.

Keep adding your picks and poofs until its just the way you like it.  I would just add a few things and then step back and see if it was all even looking and then go on from there.
Do you see the "cute" vent peeking through and disturbing my pretty mantel look?  Those are for when we use the fireplace, but that is rare because we live in Texas yall and its not normally cold enough for a fire, but anyways.  I thought of a way to "cover" them up.
I added a plastic plate charger that I got from Walmart a few years ago.  You can usually get these for $1 in most places.  Shop your stash yall!  Also, if we want to use the fireplace, I will just remove the chargers and we'll be good to go.
I snapped several pictures for this post and when I looked back at them all I could see is the little vent peeking through and looking at me!
And now you're just glowing in the back ground little vents! Um, no!  Let's fix that right now!
BAM!  No more vents peeking through!  Thanks for your service $1 chargers!  Of course all of this is temporary and when the holidays are over you can just take it all down and save it for another look some other year.

Want to see more Christmas Ideas?  Click on the links below.

Vintage Tablecloth Curtain - The Christmas Version

How to Make Stove Top Potpourri

Countdown to Christmas with Free Printables

Peppermint Pretzel Bark - A Sweet Little Gift 

Clothespin Snowflake Ornament

DIY Vintage Christmas Decor

Christmas Shutter Decor

Clothespin Christmas Tree

Our Front Porch Tree

How to Wrap a Gift

Our Burlap Forest

Twig Snowflake Ornament

It doesn't have to be done all at once.  It is a slow process in the works! C-ya next time!

I'm Linking to:
These lovely and FUN parties!
Between Naps on the Porch
The Dedicated House  - (I was featured)

Pin It!

Sunday, January 25, 2015

Valentine Heart Banner

Have you decorated for Valentine's Day yet?  How about this cute banner for your decor this year?  It's really simple to make and best of all its inexpensive!
I normally try and use black and red on my mantel, so that's what I used as my color scheme when making this banner.  I just used what I had in my craft stash and this little cutie cost me nothing!  Shop your own goodies when you want to create for less.
I used some basic packing twine to hang it, you know, the kind you use for postage type projects.  For the length of your twine, you will just need to measure your space where you plan on hanging your banner and go from there.
I used my Cricut Expressions machine and the Doodlecharms cartridge for my hearts.  My big heart measures 6", the medium one is 2" and the smallest one is 1".  I used old book pages and scrapbook papers in Valentine colors to cut out my hearts.  I got my wrinkle ribbon HERE.  I used it to make my little bow on the upper right hand side of each heart.  Each one is tied with more of the postage twine.
To make the little dangling hearts you see here, I used an old book page with my Cuttlebug and my scalloped heart Nesties to cut those out.  I cut out 12 hearts and then used two each to glue the red sewing thread in between each of them to create this look.
After you created your four completed hearts, attach them to the twine with tiny clothespins and then wrap the threaded hearts on by wrapping the thread around the twine.
Here's the cat's eye view.  When I first hung this up, the cats were very intrigued, but thankfully they have not bothered any of it. YAY!

I love this little vignette that I created on the fireplace area.  So happy and cheerful!

Ornament Heart Wreath, go HERE.
Pretty Rose Kissing Ball, go HERE.
Vinyl and Vintage Plates, go HERE.

It doesn't have to be done all at once.  It is a slow process in the works! C-ya next time!

I'm Linking to:
These lovely and FUN parties!
Between Naps on the Porch
DIY Home Sweet Home
We Call It Junkin

Pin It!

Sunday, November 24, 2013

2 Easy Buntings for Your Fall Decorating

We don't have a lot of decorations for Thanksgiving, but we do have a few. I also made a few new ones, I made two different buntings from items I already had around the house.  They are both very easy to put together. Easy is good, right?
This is what our mantel looks like right now. Very minimal huh? I like it!  I even kept the little 2x4 pumpkin out that I showed you how to make HERE.
First is the Folded Bookpage Bunting.  So easy a kid can do it!  Remember when you were a little girl and you folded notebook paper into a fan? Same technique here, just use old book pages. 
I folded each book page in half  long ways and then folded them in half again at a slight angle, punched a hole in the bend and then strung them on a long piece of jute twine.  There are 12 single pages in the center of the bunting and then the two "fans" on the end are four pages together.  I made a loop in the jute on each end for hanging.
Now for the Natural Pinecone Bunting.  Even easier, well if you have a sweet honey to help you like I do!  Thank you Baby!
You'll need something to hang your pinecones on the twine.  We used some heavy wire and my honey bent them by hand (with pliers) into little hooks for me.  I tried, but I'm too weak! LOL!
Next, drop a dollop of hot glue on the bottom of the pinecone and add your hook.
Now its ready for hanging on a long length of jute twine.
I hung the big pinecones on the outside and little ones on the inside, but that's how I roll! :)
If you follow me on Instagram you may have already seen this picture.  My little photo bomber Sarah!
And speaking of photo bombers...meet Zel!  He's the sweetest boy EVER!  I really love the simple decor our little fire place is sporting right now. You know.....its almost time to break out the Christmas goodies!

It doesn't have to be done all at once.  It is a slow process in the works! C-ya next time!

I'm Linking to:
Sunday
Under the Table and Dreaming by Stephanie Lynn

The Self Sufficient Home Acre 
The Chicken Chick,  Sew Can Do
Monday
Craft-O-Maniac, 

Between Naps on the Porch
DIY Home Sweet Home
Keeping it  Simple 
The Dedicated House
Skip to my Lou
Home Coming
Tuesday
Not Just a Housewife

My Uncommon Slice of Suburbia
Sugar Bee Crafts 
New Nostalgia 
It's your Life

BeBetsy
Fluster Buster   
Confessions of a Plate Addict
A Stroll Thru Life
Wednesday
Clean and Scentsible

Lady Behind the Curtain
Family Home and Life
Ducks n a Row
VMG206
Herrban Momma 
Family Home & Life
Oh My! Creative
Thursday  
Bloom
The Taylor House
52 Mantels
Domesblissity
4 You With Love
Sweet Haute
Artsy Fartsy Mama
From My Front Porch To Yours
Friday 
Lil’ Luna
Tatertots and Jello
Five Simple Things
Craftionary
Diana Rambles
I Heart Nap Time
Crafts a la mode
Saturday 
Angels Homestead
Positively Splendid,
Or So She Says
Your Homebased Mom
What's Cooking with Ruthie
Made From Pinterest

Pin It!

Sunday, February 10, 2013

Sweater Heart Garland

Our room is done in shades of blue and I wanted a little Valentine love in there too, so I created this sweater heart garland.  It took a little time to stitch around the edges of each heart, but it was well worth it.
Who knew just a few sweater hearts (stitched with love of course) and some jute twine added such Valentine love to our cozy room.
I decided on five hearts.  I learned a long time ago that you are supposed to use odd numbers when decorating, I hope that's right!  I had some leftover sweaters that I'd used for a sweater pumpkin project, so I cut out the hearts and used some embroidery thread to stitch around the edge of each one for just a little extra sumthin'.
It was well worth the time it took to create when I got them all strung on the twine and hung up on the dresser that stands beneath the window. I love it!
I try not to make our room to frilly and girly so its comfortable for both of us and I think these little hearts are just right for keeping that in mind. No frills here!

It doesn't have to be done all at once.  It is a slow process in the works! C-ya next time!

I'm Linking to:

Sunday
Under the Table and Dreaming by Stephanie Lynn

The Self Sufficient Home Acre 
The Chicken Chick
 
Monday
Craft-O-Maniac
Between Naps on the Porch
DIY Home Sweet Home
Keeping it Simple

Thrifty Decor Chick
The Dedicated House

Tuesday
Not Just a Housewife
My Uncommon Slice of Suburbia

Wednesday
Lil’ Luna
Clean and Scentsible
Green Eggs and Goats
Lady Behind the Curtain

Thursday
Bloom
Two Yellow Birds Decor

The Busy B's

Friday
 
Tatertots and Jello
Joyful Stamper
Craftionary

Saturday
Positively Splendid
I Heart Nap Time

Or So She Says 
Your Homebased Mom 

Pin It!

Sunday, February 3, 2013

Chalkboard Art for Valentine's Decorating

Although the post title states Valentine's decorating, I suppose you could this phrase all year long if you wanted to.  All you need is love, love is all you need.  No truer words could be spoken in song by the Beatles.  While browsing Pinterest, I noticed a lot of people using Beatles songs for their chalkboard art...I love it!
Mr. Bear seems to be smiling in approval of the chalkboard art that is hung above him...or maybe its his flower made with cupcake liners that he holds in his hand.  I found the idea HERE.  So sweet, but very time consuming!
To create my chalk masterpiece I used white chalk only.  I wrote out the complete phrase first and then went over it several times to make it more bold.  The "love" was gone over probably about 4 or 5 times.  To make the white area that the "love" sits in I simply turned the piece of chalk on its side and ran it across the surface and then rubbed it with my finger tips to make it blend better.
To create the shadow effect I used a damp paper towel and removed the chalk back to the black chalkboard color. Cool huh?  And just for a little added Valentine's detail, I dotted the I(s) with hearts.
Only 11 more days till Love Day!  Good thing we decorated early so we could enjoy all the colors of Valentine's Day a little longer.

It doesn't have to be done all at once.  It is a slow process in the works! C-ya next time!

I'm Linking to:

Sunday
Under the Table and Dreaming by Stephanie Lynn

The Self Sufficient Home Acre 
The Chicken Chick
 
Monday
Craft-O-Maniac
Between Naps on the Porch
DIY Home Sweet Home
Keeping it Simple

Thrifty Decor Chick

Tuesday
Not Just a Housewife
My Uncommon Slice of Suburbia

Wednesday
Lil’ Luna
Clean and Scentsible
Green Eggs and Goats
Lady Behind the Curtain 

4 You with Love

Thursday
Bloom
Two Yellow Birds Decor

Friday
 
Tatertots and Jello
Joyful Stamper
Craftionary

Saturday
Positively Splendid
I Heart Nap Time

Or So She Says 
Your Homebased Mom 

Pin It!

Sunday, January 20, 2013

Pretty Rose Kissing Ball

I wanted a few new Valentine's Day decorations so I thought I'd make them myself.  The first one I've tackled is a pretty rose kissing ball.  I've seen these kissing balls around the webs and figured it would be easy to recreate one.  I got my basic idea HERE.
I love how it turned out!  It was simple to do and only took me about 30 minutes total to complete.
To recreate my kissing ball you will need the following items which I purchased at Wal Mart.

(4) silk rose bushes - .97 each
(1) 5" Foam ball - $3.00
(3') Craft Ribbon - $1.97
(10) Pearl head pins - 2.97
Hot glue gun and glue optional

After I broke down the cost of supplies it took to make one ball, the total cost for this kissing ball was $7.72.
To make the ball, remove the buds and the leaves from the stems and start poking them into the foam ball until you've used up all the flowers and leaves.  I used 4 rose bushes and there was still some foam showing on the bottom, so I used more of my ribbon to cover it up.  Just fold your length of ribbon in half and use one of the pins to secure it.
I perched the finished kissing ball on an old black candlestick I had and it was done!  It will be going in on the mantel with the rest of the black and red vignette I've created in there.  What have you made for love day...please leave me a link, I'd like to visit you and see what loveliness you've come up with.

It doesn't have to be done all at once.  It is a slow process in the works! C-ya next time!

I'm Linking to:

Sunday
Under the Table and Dreaming by Stephanie Lynn

 
Monday
Craft-O-Maniac
Between Naps on the Porch
DIY Home Sweet Home
Keeping it Simple

Thrifty Decor Chick

Tuesday
Not Just a Housewife
My Uncommon Slice of Suburbia

Wednesday
Lil’ Luna
Clean and Scentsible

Lady Behind the Curtain
Green Eggs and Goats
4 You with Love

Thursday
Bloom
Two Yellow Birds Decor

Friday

Tatertots and Jello
Joyful Stamper
Craftionary

Saturday
Positively Splendid
I Heart Nap Time

Pin It!

Sunday, January 13, 2013

Bedroom Lamp Makeover

We've been looking for the perfect sized pair of lamps for our bedroom at thrift stores and yard sales for a long time with no success. Finally I found a pair at an estate sale and I grabbed them up for $5 each! YAY!
Right now our room is in shades of blue with a beachy-sea kinda theme, but that could change at any time (cuz that's how I roll) so we needed a color that would always "go" with whatever the theme happens to be.  We chose Rustoleum's oil rubbed bronze (ORB) because it matched the other light fixtures in our room and bathroom.
 
This is the lamps before.  I love red and would totally have red everything in my house, but the other people who live here don't share the same passion for red as I do.  What?  Yeah!  It was a little on the hard side to paint these, but I did and I'm so glad I did now!
First I taped off the light bulb receptacle and the cord so they didn't receive any unneeded paint.  I just used blue painters tape as you can see here.  NOTE: Before I painted the lamps I cleaned them really good with Windex to make sure they were dirt free to assure a good paint adhesion. Next I used a primer to give me a good base for my paint. Sorry I didn't snap pictures of those steps! Oooopsie!
Tah Dah!  The final results!  This is the lamp on my Honey's side of the bed.  His vintage Italian crucifix lives on the shade when he's not wearing it.....love how it looks there!  I'm still trying to decide if I want to stencil the shades? Any suggestions?

Green Eggs and Goats

Pin It!

Sunday, December 23, 2012

Picture Frame Pine Cone Wreath

My Mama recently sent a basket of pine cones home with me that my brother and I picked up on a family vacation oh about 30 years ago and I wanted to create something with them for her so she could enjoy them for many years to come. Here's what I came up with!
Of course I searched Pinterest, its my go to for inspiration these days, and I saw many different ideas.  The ones that caught my eye the most were the picture framed shaped wreaths. So different from the everyday round wreath.   
I have a stash of old picture frames...crazy huh?  I picked out one I thought would work and then I laid the pine cones around to see if it would be the right size and YES! I think so.
Then I started gluing the pine cones to the frame until I got all the way around and then I went back and filled in the gaps to make it look fuller. WARNING! I burnt my finger with hot glue really bad while making this wreath, so please be very careful while using your glue gun! I thought about adding a picture of my damaged finger to this post, but its much too graphic for some to see...just believe me when I say BE CAREFUL!
This is how it all looked when I finished adding all the pine cones to the frame.  I love how some of the pine cones still have their little stems on.  30 year old pine cones are delicate, so its amazing the little stems made it!
Lastly I added some ribbon to hang it with and then added some smaller version of the same ribbon to hang the last of the pine cones from the inside center of the frame.  I used every last pine cone that Mama saved from our trip from so many years ago.  The only one that is not OLD, it this very bottom pine cone (blurry, sorry) and it came from Mama's yard from last years crop.
Here it is, all 30 years of it! LOL!  It now lives at Mama's house on her front door.  Although it was a Christmas present, I wanted her to have it early so she could enjoy it longer this year.  She loves it!

Mama and I were thinking it needs some type of preservative on the pine cones since they are so old and delicate.  If you have any suggestions, I'd love to hear them!

It doesn't have to be done all at once.  It is a slow process in the works! C-ya next time!

I'm linking to:


Saturday Seven
UndertheTableandDreaming
Keeping It Simple

My Uncommon Slice of SuburbiaGrab a Bloom Button

I Heart Nap Time

Pin It!
01 09 10