
Hey there! I hope you are doing well. The weather is finally acceptable here in Texas. Yesterday my oldest son, my DIL, my grands and I went to our local Festival and we experienced the solar eclipse too! We all had so much fun! Best of all, the weather was perfection! I wore a sweater yall!
Anywhoobs, lets get on to this little fun project. It's kind of late in the season, but pin it for next year for sure.
Wreaths are a fantastic way to add a touch of festivity to your home, and when it comes to Halloween, there's nothing quite as iconic as a witch's hat. In this step-by-step guide, we'll show you how to transform rolls of decorative mesh from Dollar Tree into a bewitching wreath that's perfect for the season.

Materials Needed
- 1 wire or plastic witch hat form
- 3-4 rolls of decorative mesh in colors you prefer. I used orange, yellow, black and combo of colors
- 1 package of decorative mesh tubing
- 2 packages of Spooky Cloth, I used gray, but black would be best.
- Pipe cleaners
- Witch legs decoration
- Foil
- Scissors
- Glue gun and glue sticks (optional)

Step 1: Gather Your Materials
Before diving into the project, make sure you have all the necessary materials ready. You can find most of these items at your local Dollar Tree, making this project both budget-friendly and fun.

Step 2: Prepping the Hat Form
Unroll the tinsel from the bottom to expose the form. If you find the wire form, this step will not be necessary. Use a piece of foil to create a more pronounced tip on the hat.

Step 3: Covering the Hat with Spooky Cloth
Use two packages of Spooky Cloth to cover the entire hat, top to brim. Start at the brim and wrap cloth around making sure to cover all the tensile as you go. Tuck in the end or glue to secire.
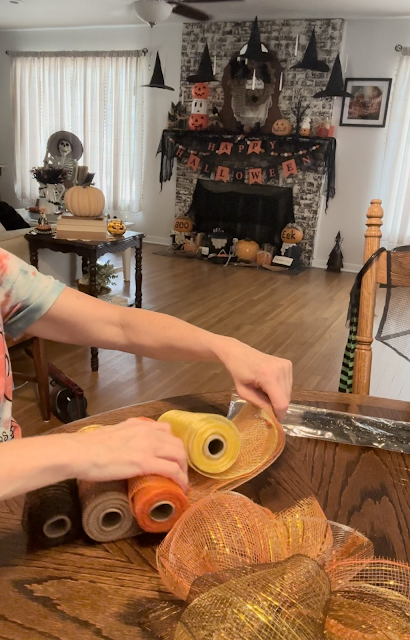
Step 4: Prepping the Mesh
Unroll your decorative mesh and cut it into 12-inch sections. You'll need quite a few, so take your time and be precise. This will form the base of your wreath. Stack all four rolls together for a quicker process.


Step 5: Attaching the MeshGather a section of mesh and bunch it up in the center, creating a sort of bowtie shape. Attach it to the wire wreath form using a pipe cleaner or a piece of floral wire, securing it tightly. Repeat this process, slightly overlapping each section, until the entire wreath form is covered. Start in the middle for your first bundle, then alternate from side to side to get an even amount as you go.

Step 6: Embellishing Your Wreath
Now comes the fun part! Get creative with your embellishments. Add spiders, ribbons, or any other spooky trinkets you like. Secure them using hot glue, placing them strategically around the wreath to create balance and visual interest.
Add the witch legs decoration, securing it with a pipe cleaner or floral wire.

Step 7: Creating a Hanging Loop (Optional)
If you plan to hang your wreath, fashion a loop out of a pipe cleaner or ribbon and attach it securely to the back of the wreath using hot glue. The legs should dangle freely. You can use some sticky tack to attach them to your door to position them.

Step 8: Final Touches
Inspect your wreath for any loose ends or areas that need a bit more securing. Trim any excess mesh or wire to achieve a neat, polished look.
Congratulations! You've successfully transformed rolls of decorative mesh from Dollar Tree into a spooktacular Witch Hat Wreath that's bound to be the envy of your neighborhood. Hang it on your door, above the mantel, or anywhere else that could use a touch of Halloween magic. Get ready to receive compliments from neighbors and grocery delivery staff alike. Happy crafting!
For more fun Fall ideas, go visit my Instagram. I post every single day. Find me @TexasBlueBunglaow on Instagram.
If you loved any of these ideas and want to save them for later, be sure to pin it to your favorite Pinterest board. I have a Pinterest board set up for all kinds of Halloween ideas and it's called Boo to You. I'm pinning something new on Pinterest every day. Won't you join me?
***I am a participant in the Amazon Services LLC Associates Program, an affiliate advertising program designed to provide a means for me to earn fees by linking to Amazon.com and affiliated sites.**


Such an adorable wreath, DeeDee!! Totally budget friendly and a nice easy craft for anyone to make! Thanks so much for sharing at Home Imagined this week!
ReplyDeleteThank you so much my sweet friend. It was so fun to make! :)
DeleteSpooky CUTE, DeeDee!
ReplyDeleteWe will be featuring you starting Wednesday at the Creative Crafts Linky Party! Pinned and shared!
Creatively, Beth
Hi Beth! Thank you so much my sweet friend, I really appreciate the feature! :)
DeleteThis is so charming!! I love it. It's perfect for Halloween and it's super creative. Thank you for sharing this post with the Home Imagined Link party!
ReplyDeleteHi there! Thanks so very much sweet friend, it was a fun craft to make!
Delete