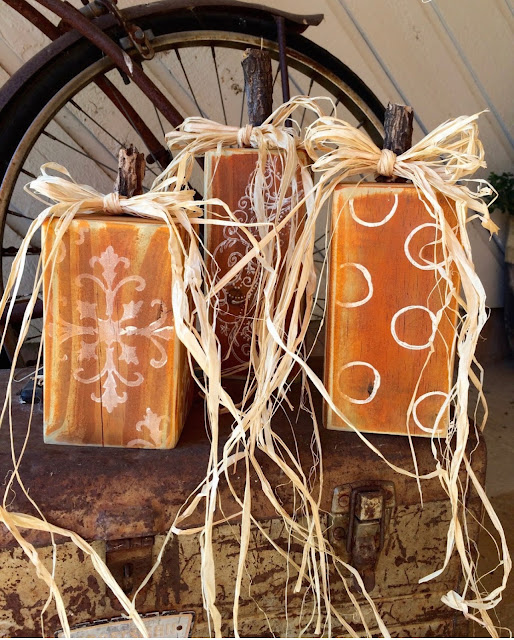
Hey there! I hope this day is treating you well. It's finally Fall with a little Summer mixed in here in Texas. That is totally normal for us, we are used to it and we will take any Fall weather we can get after our long Summer of million degree temps. Anywhooobs, let get on to this fun DIY that you can use for your Thanksgiving decor. TBH, I'm not going to decorate much for Thanksgiving this year because I have to hurry and get my Christmas decor up due to me having surgery the week after Thanksgiving. I will be unable to lift anything much for two months. I love Christmas so much, I'm willing to skip out on the Fall decor just to be able to enjoy the trees and twinkle lights this year.
Fall is here, and that means it's time to embrace the cozy and festive spirit of the season. One delightful way to do this is by incorporating pumpkins into your home decor. In this blog post, I will show you all the how-tos of a fun and creative DIY project using 4x4 wood blocks to make charming pumpkins. I'll then add a personal touch by stamping them with vibrant designs. Let's dive in!
Materials Needed
- 4x4 wooden blocks (squared)
- Sandpaper (medium-grit)
- Acrylic paints (orange, white or cream)
- Paintbrushes (sponge brush)
- Stamps (any design)
- Sticks from your yard
- Hot glue gun and glue sticks
- Optional: twine, ribbon or raffia for embellishments
- Optional: Antiquing Glaze
Prepare Your Wood Blocks
Start by sanding the edges and surfaces of your 4x4 wood blocks to ensure they are smooth and free from splinters. This will provide a clean canvas for your pumpkin design.
cut two of them down so that they ended up being one at 8", 7" and 6". I used the rotary sander to round off the edges and smooth them out before painting.
Paint the Pumpkin Base
Now comes the fun part—painting! Using orange acrylic paint, cover the entire pumpkin. Apply one, two or three coats as needed, allowing each coat to dry completely before adding the next. I grabbed a paper plate, a sponge brush and my pumpkin orange paint and got to painting. I did not paint the bottoms, but all other sides got one good coat.Stamping Time
Select your preferred stamp(s) and dip it into the paint. Gently press the stamp onto the pumpkin's surface. You can create patterns, accents, or even use different stamps for a varied look. Let the stamped design dry. I used white paint and a few foam stamps as well as a toilet paper roll (the circles) and added some designs to my pumpkins.Create the "Stem and Vine"
Use a stick from your yard to create the stem. Add the stick on with hot glue. Use natural colored raffia to create the vine on the pumpkin. Tie the raffia in a bow around each stick. This not only adds a realistic touch but also enhances the overall visual appeal.
Seal the Pumpkin (Optional)
If you want to give your pumpkin a protective finish, consider applying a clear varnish or sealant. This will help preserve the colors.
Congratulations, you've just crafted your very own wooden pumpkins! These delightful decorations are perfect for adding a touch of autumnal charm to your home. Whether displayed on a mantle, incorporated into a centerpiece, or scattered throughout your living space, these DIY pumpkins are sure to evoke the warm and cozy feeling of fall. Get creative, have fun, and enjoy the season!
For more fun Fall ideas, go visit my Instagram. I post every single day. Find me @TexasBlueBunglaow on Instagram.
If you loved any of these ideas and want to save them for later, be sure to pin it to your favorite Pinterest board. I have a Pinterest board set up for all kinds of Fall Decorating ideas and it's called Fall Decor to Try. I'm pinning something new on Pinterest every day. Won't you join me?
***I am a participant in the Amazon Services LLC Associates Program, an affiliate advertising program designed to provide a means for me to earn fees by linking to Amazon.com and affiliated sites.**


This is so incredibly well done, love it and then also to repurpose and old book iso trashing it.
ReplyDeleteI visited you via Tuesday Turn About #226
I linked up this week with = 46+47. Come and join us Mon - Saturday at SeniorSalonPitStop as well as #WordlessWednesday #Photography Wednesday - Saturday. You will find the info under BLOGGING
Thank you so much for stopping by! I will visit soon. :)
Delete