Showing posts sorted by relevance for query fence picket. Sort by date Show all posts

Sunday, September 24, 2023

Crafting a Cheerful Scarecrow: Repurposing an Old Fence Picket

Hey there!  I hope you're doing good.  It's been busy around here now that it's finally cool enough to do things outside again.  I type this knowing that it will be 100 degrees today. Lol!  Texas weather, gotta love it!  I'm going to show how I made this cute little scarecrow guy today.  Let's go!

Scarecrows have been a timeless symbol of the countryside, not only for their practical use in protecting crops but also for their rustic charm. Creating your own scarecrow from recycled materials adds a personal touch to your decor while contributing to sustainable crafting. In this post, I will walk you through the steps to craft a unique scarecrow using an old fence picket.

Materials Needed:

  1. Old Fence Picket and Scrap Wood
  2. Burlap Scrap
  3. Silk Flower
  4. Twine or String
  5. Hot Glue Gun and Glue
  6. Pencil
  7. Scissors
  8. Paints and Paint Brushes - I used Acrylic Paints
  9. Sandpaper and Drill (Optional)
  10. Step 1: Gathering Supplies

    Begin by collecting all the materials needed for this project. The centerpiece, of course, is the old fence picket. Make sure it's clean and free from any splinters or nails. You will also need a scrap piece of wood for the hat brim.

    These are the two colors I used for the scarecrow face and hat.  I also used a dark brown and an orange for the face.

  11. Step 2: Prepare to Paint

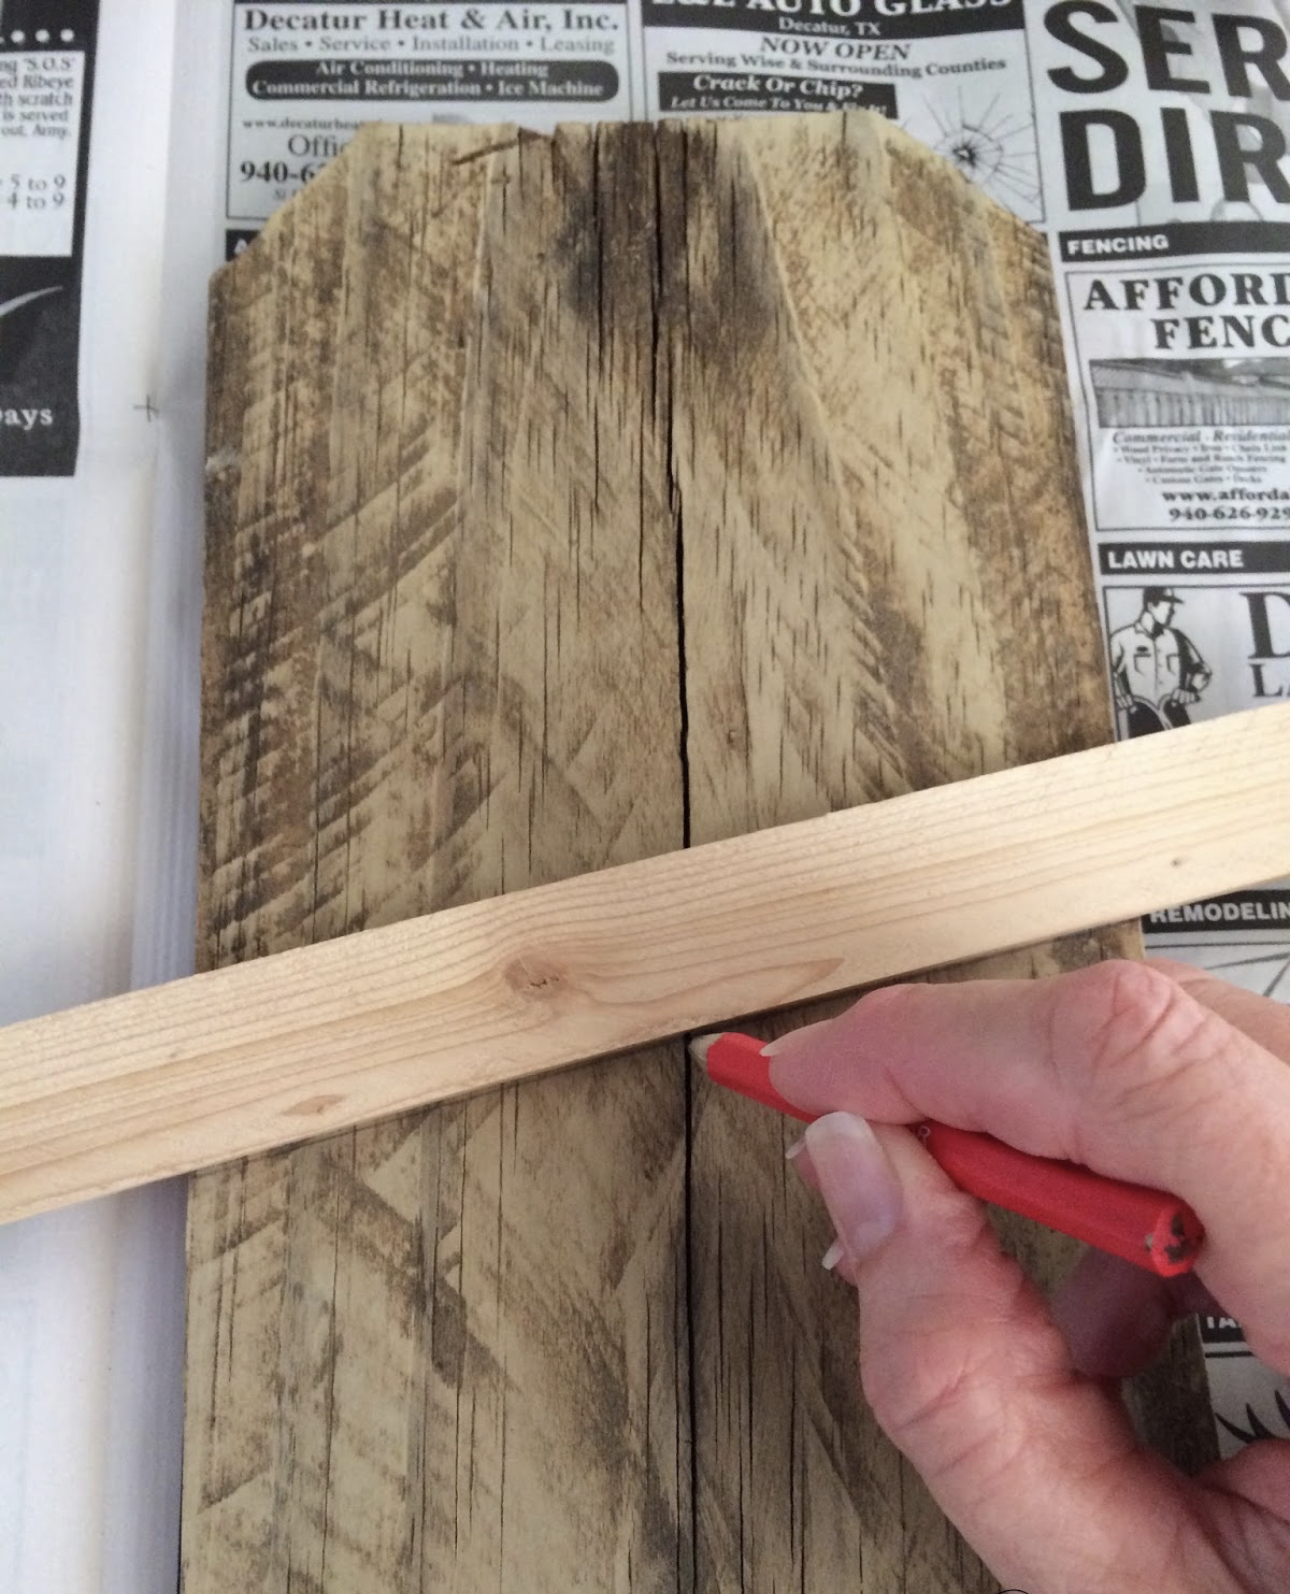
  12. Use a pencil to draw a line where you want the face to stop and the hat to begin. Use your scrap wood as a guide.
  13. Step 3: Painting

  14. Use the warm buff color to paint the face area up to your line.  Try not to get a really good coverage as it gives a rustic look.

  15. Use the golden sunset color to paint the brim piece and the hat area.  If you like the rustic look, go out and sand off the edges and run the sander over the whole top area where you just painted.


    Step 4: Creating the Face

  16. Use the pencil and draw in the face. Using the dark brown paint color, take the end of your pencil and made two dots for the eyes.  Use a very small and very pointed paint brush to add the rest of the facial details.
  17. Step 5: Adding the Hat

  18. Use hot glue to attach the brim.
  19. NOTE: 
  20.  Add squiggly lines around the perimeter of the entire project.
  21. If the freshly painted face is a little too bold, sand it down lightly to achieve the look you want. 

  22. Step 6: Final Touches

  23. Snip a little piece of burlap, pinch it in the middle and hot glued it down on the wood, then add the flower to finish it off. Drill two holes in the top corners and added some jute twine to hang with.

  24. Creating a scarecrow from an old fence picket is a rewarding and eco-friendly project that adds character to your decorations. This charming guardian of your porch not only serves as an adorable accent but also brings a touch of rustic beauty to your outdoor space. By upcycling materials, you're not only contributing to sustainable crafting but also giving a new life to forgotten items. Happy crafting!

  25. Want to see more of my fence picket projects?  See below.

    Fence Picket Scarecrow: Click HERE
    Fence Picket A/C Cover: Click HERE
    Pretty Picket Planter: Click HERE
    Picket Fence Stand: Click HERE
    Picket Fence Shelf: Click HERE
    Master Bathroom Mini Makeover: Click HERE
    Fence Picket Wall: Click HERE

  26. For more fun Fall ideas, go visit my Instagram. I post every single day. Find me @TexasBlueBunglaow on Instagram.

    1. If you loved any of these ideas and want to save them for later, be sure to pin it to your favorite Pinterest board.  I have a Pinterest board set up for all kinds of Fall Decorating ideas and it's called Fall Decor to Try.  I'm pinning something new on Pinterest every day. Won't you join me?

      ***I am a participant in the Amazon Services LLC Associates Program, an affiliate advertising program designed to provide a means for me to earn fees by linking to Amazon.com and affiliated sites.**


Pin It!

Sunday, September 20, 2015

Fence Picket Scarecrow

So one day I was strolling through my Facebook page when I came across the cutest scarecrow made of wooden pallet slats, of course I loved it and wanted to make my own.  I decided to use what I have, which is lots of old fence pickets.
First, I went to Pinterest and found my inspiration.  THIS was the cute little scarecrow that I made mine after.  So cute and what talent Megpie Designs has!  WOW!
I went out to our fence picket pile and picked out a scrap of picket fence and then I cut it off to measure 12 inches tall.  I also grabbed another scrap of wood (we save everything LOL!) that I cut off to measure 10 inches long.  Its about the thickness of a paint stick to give you reference. Then I lightly sanded them to be a bit smoother and to round off the ends of the brim piece.
These are the two colors I used for the scarecrow face and hat.  I also used a dark brown and an orange for the face, that I forgot to get in the picture! Sorry!
Using a pencil, draw a line where you want the face to stop and the hat to begin.
Using the warm buff color, paint the face area up to your line.  I tried not to get a really good coverage, because I like the rustic look.
Next I used the golden sunset color to paint the brim piece and the hat area.  Then, because I like the rustic look, I went out and sanded off the edges and ran the sander over the whole top area where I had just painted.
I grabbed my pencil again and drew in the face. Using the dark brown color, I used the end of my pencil and made two dots for the eyes.  Again I failed to show you, but I used a very small and very pointed paint brush to add the rest of the facial details.
Next, I used hot glue to attach the brim and then the little piece of burlap and a small sunflower to the scarecrow face.  Lastly, the freshly painted face was a little too bold for me, so I sanded it down lightly to achieve the look I wanted.
Here's a close up of the burlap accent.  I just snipped a little piece of burlap, pinched it in the middle and hot glued it down on the wood, then added the flower to finish it off.
Finally,  I drilled two holes in the top corners and added some jute twine to hang with and I was done!  He's so adorable if I do say so myself!

It doesn't have to be done all at once.  It is a slow process in the works! C-ya next time!

Want to see more of our fence picket projects?  See below.

Fence Picket Scarecrow: Click HERE
Fence Picket A/C Cover: Click HERE
Pretty Picket Planter: Click HERE
Picket Fence Stand: Click HERE
Picket Fence Shelf: Click HERE
Master Bathroom Mini Makeover: Click HERE
Fence Picket Wall: Click HERE

I'm Linking to THESE lovely and FUN parties!

And here are a few more too!
Between Naps on the Porch
DIY Home Sweet Home
We Call It Junkin

Pin It!

Sunday, October 7, 2018

Fence Picket Pumpkin

I'm still using up the free fence pickets I told you about right HERE.  What I've got to show you today is another one of those really fun and easy projects that I love to do.  Guess what?  The best part is, it was FREE for me to make because I just used scraps of wood we had on hand!  I actually made this little cutie all by myself with no help from my honey, its that easy! :)
I used some left over pieces of fence pickets but you could also use pallet boards as well.  My pumpkin only has two panels, but I think it would look cute with more, and smaller panels too.
To re-create my pumpkin, you will need the following:

2 - Fence pickets cut at 16 inches long
2 - 1 x 3 boards cut at 10 inches long
4 - 1 inch long wood screws
Stick from the yard
Hot glue gun with glue sticks
Acrylic paint in orange
Paint brush
Raffia
Drill
Chop Saw
Sander and 220 grit sandpaper
Using the chop saw, I cut my fence pickets and 1 x 3s to length.  Then using the 45 degree setting, I took off the outside corners of each fence picket.  Use next photo for reference.
Decide which side is going to be the front of your pumpkin and then place the two pickets face down on your work surface.  Attached your 1 x 3 boards using the drill and the 1" wood screws like you see above.
Now grab your hot glue gun and add the stick from your yard in the center of your pumpkin.  This is your stem.  Let it cool completely before proceeding.
You can stop here and be done or you can keep going like I did and add a few more details to it.
I just happened to find in my stash some Pumpkin Orange paint, how appropriate! :)
I grabbed my chip brush and then added the orange paint by using the dry brush method.  This way you can still see the wood grain show through.  Let that dry well, about 10 minutes will do.
 
This step is optional, but I like to distress everything I make.  I grabbed our Mouse Sander and some 220 grit paper and smoothed out all the edges as well as scuff up the top edges all the way around and then for a little more distress, I went over the entire front side a few times.
Here it is! Isn't it cute?  I tied a little bit of raffia around the stem to finish it off.  You could also add a few fall colored flowers with hot glue if you like.
Now you have a new piece of Farmhouse decor to use year after year in your Fall decorating.  Also, what a fun and easy gift to give to your "I decorate for every occasion" friend or family member!

Want to see more of our fence picket projects?  See below.

Fence Picket Scarecrow: Click HERE
Fence Picket A/C Cover: Click HERE
Pretty Picket Planter: Click HERE
Picket Fence Stand: Click HERE
Picket Fence Shelf: Click HERE
Master Bathroom Mini Makeover: Click HERE
Fence Picket Wall: Click HERE

It doesn't have to be done all at once.  It is a slow process in the works! C-ya next time!


I'm Linking to:
These lovely and FUN parties!
Between Naps on the Porch
The Dedicated House  - (I was featured)

Pin It!

Sunday, July 30, 2023

Crafting a Charming Pumpkin with Fence Pickets: A Delightful Fall DIY Project

Hey there! I hope all is well where you are.  It's still hot in Texas....I feel like a broken record at this point!  Anyway, lets get to the project because its a super fun and easy one!

As the days grow shorter and the crisp scent of autumn fills the air (I'm dreaming over here of course), it's time to embrace the spirit of the season by indulging in creative and delightful DIY projects. Fall provides the perfect opportunity to infuse your home with cozy and rustic charm. And what better way to do that than by crafting a pumpkin with fence pickets? This unique and imaginative project will not only elevate your decor but also bring a touch of warmth to your living space. Let's dive into the steps and materials required to create a captivating pumpkin with fence pickets that will surely become the highlight of your fall decorations for years to come.

I used some left over pieces of fence pickets but you could also use pallet boards as well.  My pumpkin only has two panels, but I think it would look cute with more, and smaller panels too.


Materials Needed:

Before we start, gather the following materials:

2 - Fence pickets cut at 16 inches long
2 - 1 x 3 boards cut at 10 inches long
4 - 1 inch long wood screws
Stick from the yard
Hot glue gun with glue sticks
Acrylic paint in orange
Paint brush
Raffia
Drill
Chop Saw
Sander and 220 grit sandpaper

Using the chop saw, I cut my fence pickets and 1 x 3s to length.  Then using the 45 degree setting, I took off the outside corners of each fence picket.  Use next photo for reference.

Decide which side is going to be the front of your pumpkin and then place the two pickets face down on your work surface.  Attached your 1 x 3 boards using the drill and the 1" wood screws like you see above.


 Now grab your hot glue gun and add the stick from your yard in the center of your pumpkin.  This is your stem.  Let it cool completely before proceeding.

You can stop here and be done or you can keep going like I did and add a few more details to it. 

I just happened to find in my stash some Pumpkin Orange paint, how appropriate! :)

I grabbed my chip brush and then added the orange paint by using the dry brush method.  This way you can still see the wood grain show through.  Let that dry well, about 10 minutes will do.

This step is optional, but I like to distress everything I make.  I grabbed our Mouse Sander and some 220 grit paper and smoothed out all the edges as well as scuff up the top edges all the way around and then for a little more distress, I went over the entire front side a few times.

Crafting a pumpkin with fence pickets is a delightful and imaginative way to celebrate the fall season. This DIY project allows you to infuse your home with rustic charm while indulging in the joy of creating something unique and personalized. So, gather your materials, unleash your creativity, and let this enchanting pumpkin brighten up your living space during the cozy and colorful days of fall. Happy crafting!

Want to see more of our fence picket projects?  See below.

Fence Picket Scarecrow: Click HERE
Fence Picket A/C Cover: Click HERE
Pretty Picket Planter: Click HERE
Picket Fence Stand: Click HERE
Picket Fence Shelf: Click HERE
Master Bathroom Mini Makeover: Click HERE
Fence Picket Wall: Click HERE

If you loved any of these ideas and want to save them for later, be sure to pin it to your favorite Pinterest board.  I have a Pinterest board set up for all kinds of Fall decorating ideas and it's called Fall Decor.  I'm pinning something new on Pinterest every day. Won't you join me?

***I am a participant in the Amazon Services LLC Associates Program, an affiliate advertising program designed to provide a means for me to earn fees by linking to Amazon.com and affiliated sites.**


Pin It!

Sunday, February 22, 2015

Fence Picket Shelf

We are doing a mini Master Bathroom remodel right now and I don't know if you've seen my Valentine's Day present this year, but if you haven't you should go have a look HERE.
Hint:  My present is this beautiful fence picket wall you see here.

My honey had the idea of a little shelf in this area to add a bit of interest to the tiny space, so he built one!  Great idea baby!  A few months ago he purchased an old shelf at a yard sale for $2.  It wasn't because he loved the hunter green painted shelf, but it had these awesome old vintage metal shelf brackets on it.  So worth the $2.
Our shelf measures 28" wide X 7 1/2" deep.  First he grabbed a couple of very straight pieces of fence picket.  He used one full picket, and part of another.   He used his table saw to rip the second picket to size and then used his chop saw to cut them down to length.  He also needed two smaller pieces of picket to hold the two pieces he'd just cut, together.  Those pieces measure 2" x 7 1/2".
He used 1" wood screws to attach the 2" x 7 1/2" pieces to the two longer pieces.  Now they are one solid shelf piece.

NOTE: We did not sand the pickets.  We used a broom to sweep off the visible dirt and then the shop vac to clean off the smaller stuff.
Now to attach the brackets.  Look how pretty those metal brackets are!  Since the metal brackets were hunter green, I spray painted them with Oil Rubbed Bronze (ORB) paint and let them dry over night.  The ORB color is the color of most all of our fixtures in the bathroom, so we wanted them to match.
When my honey hung the shelf on the wall, he was sure to use a level to make sure all my cuteness stayed on the shelf and didn't roll off one end.  He always thinks of stuff like that!  He used 2 1/2" long wood screws, being sure to grab the studs when he anchored the shelf to the wall.
This little shelf will be fun to decorate and maybe change out for each holiday.  Just another fun space to doll up!
Sneak Peek!  We are still working on the bathroom each weekend, but just look at this wall my honey put up over the tub!  I love it and can't stop looking at it!  He's so awesome!  Thank you Baby!

And as I promised, here are a few more of our picket fence projects for your viewing pleasure!
Fence Picket A/C Cover : Click HERE
Pretty Picket Planter: Click HERE
Picket Fence Stand: Click HERE
Fence Picket Wall: Click HERE

It doesn't have to be done all at once.  It is a slow process in the works! C-ya next time!

I'm Linking to:

These lovely and FUN parties!
Between Naps on the Porch
DIY Home Sweet Home
We Call It Junkin

Pin It!
01 09 10