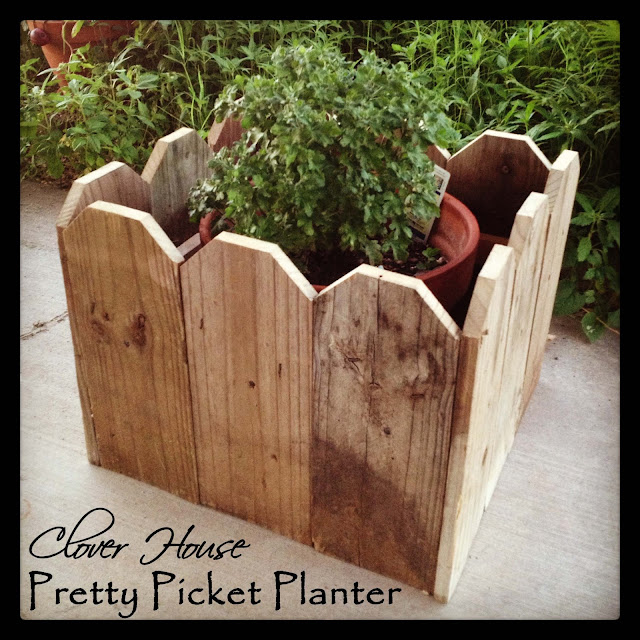
How about a pretty picket planter to tide you over until we get back to the kitchen? After we made our fence picket A/C cover HERE, we had some short pieces left over from trimming the pickets to fit our needs. Well, those short pieces were calling my name.
I cut them down even more, to 14" long to be exact. I then trimmed the corners off to resemble the original pickets (my honey's idea). We used (3) pickets on each side for a total of (12) pickets
Next, my honey made the frame work. We used some scraps from our wood pile. We cut two pieces at 14-7/8" long and two at 15" long. NOTE: You will need to lay your pickets out and measure the width of all three of them together and and then cut your frame pieces accordingly. Your measurements will rely on what kind of wood you are using for your frame as well.
Since its an out of doors piece and we wanted it to hold up to our Texas weather, we smeared some liquid nails onto the frame for extra sturdiness.
Using the air nail gun he then tacked the pickets on front and back to hold securely. We may or may not have went a bit over board, but lastly we added a few wood screws just to make sure it was good and durable for the long haul.
Here's the finished product. Cute huh? I love it! There is not a bottom, it's designed to just slip down over your pot for a little extra pizazz on your patio.
I suppose you could certainly add a bottom and some plastic liner and make it a permanent planter if you so wished, but our design was more of the simple type for now.
It doesn't have to be done all at once. It is a slow process in the works! C-ya next time!
I'm Linking to:
Sunday
Under the Table and Dreaming by Stephanie Lynn, The Self Sufficient Home Acre , The Chicken Chick, Sew Can Do
Monday
Craft-O-Maniac, Between Naps on the Porch, DIY Home Sweet Home , Keeping it Simple , The Dedicated House, Skip to my Lou
Married Filing Jointly, Home Coming, The Princess and Her Cowboys
Tuesday
Not Just a Housewife, My Uncommon Slice of Suburbia, Sugar Bee Crafts, New Nostalgia, It's your Life, Get Your Crap Together , BeBetsy
Wednesday
Lil’ Luna, Clean and Scentsible, Lady Behind the Curtain. Family Home and Life, Ducks n a Row, VMG206
Thursday
Bloom, Two Yellow Birds Decor, The Busy B's, The Taylor House. 52 Mantels, Domesblissity, Redfly Creations, 4 You With Love
Friday
Tatertots and Jello, Five Simple Things, Craftionary, Diana Rambles
Saturday
Angels Homestead, Positively Splendid, I Heart Nap Time, Or So She Says , Your Homebased Mom , What's Cooking with Ruthie


This is so fun! I love the idea of it! Would love to have you stop by and share it at our link here http://www.theprincessandhercowboys.com/2013/06/on-display-monday-7.html
ReplyDeleteHave a good one!
Britney @ The Princess and Her Cowboys
I'm loving this planter! Lately I've had a real thing for DIY Wood Planters, so this is perfect.
ReplyDeleteThank you so much for sharing.
This is super cute and really quite easy! Thank you for sharing. I'd like to invite you to our Organize Me! Sizzlin' Summer Link Up Party at Get Your Crap Together!
ReplyDeleteI love your planter box! I want one!
ReplyDeleteTherena @ littlebitofpaint.blogspot.com
Love how cute and easy this is. Stopping by from the Organize Me Sizzlin' Summer Linky. Pinning it for sure. Would love to have you link this to my Craftastic party here: http://www.sewcando.com/2013/06/craftastic-link-party-time-sprightly.html
ReplyDeleteSuch a simple, but clever idea. I like that you just slip it over your pots and then it doesn't rot on the bottom. Have a great weekend! Wendy
ReplyDeleteIt's cute and this way you don't need to worry about drainage.
ReplyDeleteSo cute and clever! Love it! Thanks for linking up to Give Me the Goods Monday! Love having you party with us! Jenna @ Rain on a Tin Roof
ReplyDeleteThose planters are so cute--great for the cottage look. Thanks for sharing the idea!
ReplyDeleteSeeing your planter project linked up at the Creative HomeAcre Hop was great! Thanks for joining us and we hope you'll come and party creatively again on Sunday at http://mumtopia.blogspot.com/2013/06/bloghop30thJune.html I wonder if you perhaps like to write a guest post for Mumtopia, please let me know - I'm sure my readers would benefit from what you have to say. For more information, please read the "Be My Guest" page at Mumtopia: http://mumtopia.blogspot.co.uk/p/write-for-mumtopia.html#.Uc3dNzvOZwQ
ReplyDeleteI love this idea and I have the perfect spot for it. I'm so happy that you came by to party with us at Fluster Buster's Creative Muster. Now that you found us I hope that you continue to join the party.
ReplyDeleteRobin @ Fluster Buster
What a great idea! It looks simple to make and cute.
ReplyDeleteGreat idea!
ReplyDeleteThanks for sharing on the BeBetsy BRAG ABOUT IT. AND for linking back to us (the link back however is to another blog-would you mind changing it-xoxo) Have a wonderful weekend!
Sharon and Denise
BeBetsy
Follow us:
Facebook ~ Twitter ~ Bloglovin ~ Pinterest
So clever, and cottagey! It's my Gardening Feature at this week's Creative HomeAcre Hop! Thanks so much for sharing such a great idea :)
ReplyDeletexo, Andrea