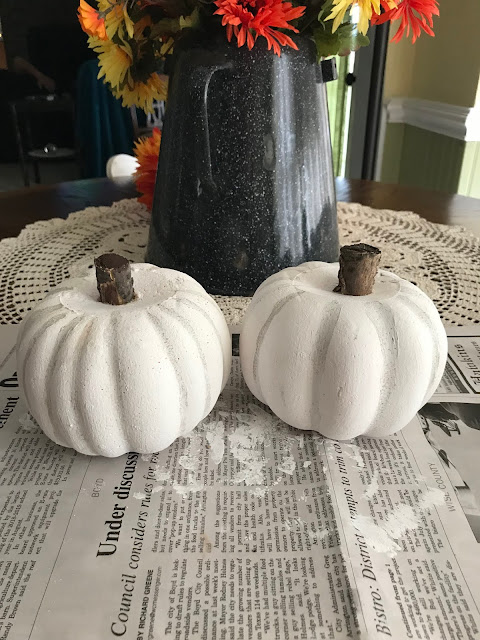
Hey there! How ya doing? It's still 100 plus degrees in Texas, is it too early to start talking about pumpkins yet? lol!
No? Good! Let me show you how to revamp your dollar store pumpkins.
When fall arrives, pumpkins are an essential part of the season's decor. They add a touch of warmth and autumnal charm to our homes, whether they're placed on the front porch, displayed on the mantel, or used as centerpieces. However, purchasing decorative pumpkins from high-end stores can quickly become expensive. But fear not! With a little creativity and some basic crafting supplies, you can give a dollar store pumpkin a fabulous makeover that will rival any expensive alternative. In this blog post, we'll explore some budget-friendly ideas to transform your dollar store pumpkin into a stunning seasonal masterpiece.
Floral Embellishments
Adding floral embellishments can take your dollar store pumpkin from plain to extraordinary. Visit your local craft store or dollar store to find artificial flowers, berries, or foliage that evoke the spirit of fall. Use a hot glue gun or floral wire to attach the elements to the pumpkin's stem or surface. Consider creating a cascading effect by attaching a few sprigs of foliage to one side, creating a whimsical and organic look. Mix and match different textures and colors to suit your personal style.
You will need the following items:
Dollar Tree $1.25 pumpkins
Acrylic paint in white, tan and brown
Paint brush of your choice
Stick from the yard for stems - I used our tree pruning shears to cut them to length. (optional)
Decorations for the top (optional)
Hot glue gun
First you will want to remove and discard the stem that comes on the pumpkin, unless you choose not to use a stick from the yard, then keep it.
Grab the white acrylic paint and a larger brush. Using a paper plate for quick clean up, squeeze out a pretty good amount of paint on to the plate.Paint the entire pumpkin with white paint. I found that it took two coats because the pumpkin is made of foam and foam is porous and it absorbs the paint a little. Let each coat dry completely before proceeding to the next step.Next grab the tan paint along with a smaller brush and squeeze a very small amount onto your paper plate. Paint lines in each ridge of the foam pumpkin. These lines do not have to be perfect. You're trying to mimic the look of a real pumpkin.
Let these dry really well before you go on to the next step.But while those are drying, grab the dark brown paint and touched up the cut end of the "stem". The other "stem" was naturally dark on top and I liked it better, so I chose to add the dark color to the other one. Of course, this step is optional.
After the tan lines have dried, take the large brush you used for the "all over white paint" and dab it into the white paint puddle again using a dry brush method. Dry brush method is: dabbing most of the paint off the brush until its almost dry. Now, go over the entire pumpkin one more time. This will soften the harshness of the tan lines you made. Let dry completely.One of the easiest ways to elevate the look of a dollar store pumpkin is through the power of paint and glitz. Start by applying a base coat of acrylic paint in a color that suits your decor. Metallic shades like gold, silver, or copper can add a touch of elegance, while vibrant colors like teal, burgundy, or even black can create a more contemporary feel. Once the paint has dried, use raffia, ribbon, lace and any other adornments. This simple technique will instantly give your pumpkin a glamorous makeover.
Decorating for fall doesn't have to break the bank, and with a little creativity, you can transform a simple dollar store pumpkin into a stunning seasonal centerpiece or display. Whether you choose to paint and glitter, decoupage, wrap in fabric, or add floral embellishments, these budget-friendly ideas will give your pumpkin a fresh and personalized makeover. So, embrace your inner artist, grab some crafting supplies, and let your creativity shine as you transform an ordinary pumpkin into a beautiful piece of autumnal decor. Happy crafting!
You can see more of my Fall decorations by clicking right here
If you loved any of these ideas and want to save them for later, be sure to pin it to your favorite Pinterest board. I have a Pinterest board set up for all kinds of Fall decorating ideas and it's called Fall Decor. I'm pinning something new on Pinterest every day. Won't you join me?
***I am a participant in the Amazon Services LLC Associates Program, an affiliate advertising program designed to provide a means for me to earn fees by linking to Amazon.com and affiliated sites.**


.jpg)
Super cute, DeeDee!! I love the neutral color of them. The lace ribbon is so pretty, too! Thanks for sharing at Home Imagined this week!
ReplyDeleteThank you sweet friend! Neutral is better for fitting in anywhere I need them to! :)
DeleteHi Dee Dee - Your pumpkins are so cute! I love the transformation. You are right - decorating for fall doesn't have to break the bank. Thank you for sharing this post with the Home Imagined Link party.
ReplyDeleteYes! Thanks so very much sweet friend!
DeleteFabulous, they look so good, what a transformation.
ReplyDeleteThank you so very much friend!
Delete