Showing posts with label Master Bedroom. Show all posts

Sunday, August 14, 2022

How to use a Vintage Door for a HeadBoard

Hey there! How ya doin'?

Remember in last week's post when I said I was making a headboard from a vintage door?  Well I made it!

Tah Dah!  I wanted to put a little shelf on top, but my talents don't extend that far yet, so maybe some other day.  For now I'm using my rose garland that I got on Amazon to make the top of it seem more finished off.

This is the door I used.  I LOVE the pretty green color.  I bought it for $20 about a year ago.  The door came out of a historic building in Weatherford, Texas.  The building now houses Edgewise Eight Brewing.  They have some excellent hand crafted brews if you're in the area!  The owner was kind enough to let me buy the door after I spotted it through an open door to the back storage area.

Anywhooooobs, let me show you how I made this headboard from a vintage door.
 

The door was very chippy, so I took some 220 grit sand paper to it using my mouse sander.  I don't really need paint chips in my bed now do I!


I scrubbed it with soapy water and rinsed all the dust and grime off of it.  I then let it dry in the sunshine for several hours.
 
I had to remove a portion of the bottom of the door.  For one, it was too long for the bed and two, it was kinda beat up!  How much you want to overhang on each side of your mattress is up to you, so reduce the length according to your liking.  I marked my cutting edge using a strip of painter's tape.
 

I used my circular saw to cut off the end of the door.  When using dangerous hand tools, BE CAREFUL and wear your PPE (Personal Protective Equipment), you want to fully enjoy your new headboard in the end. Right?

I used my mouse sander again with 120 grit paper to smooth down the freshly cut edge.  I also distressed the front side because I like the distressed look.

From where I wanted the bottom of the headboard to the floor, it measured 27.25 inches.  I measured and marked this on my "legs".  The line I made went right on the bottom edge of the door.


I took my legs (2x4 boards) inside to my bed and using a pen, traced the holes where the bolts will attach to the bed frame  Then drilled the holes using a 5/16" drill bit.
 
My bolt assembly for attaching the headboard to the bed frame is as follows:
(1) 5/16" x 2 1/2" Bolt
(2) 5/16" Washer
(1) 5/16" - 18 Nut
You will need times (4) on all these or more if you have extra holes on your frame.
 
I cut the legs to reach from top to bottom of the door.  I left each leg a few inches away from the top.  I cut each leg at 55", but each door might be different, so measure your door accordingly.
 
NOTE: I had to stop what I was doing and go back to the lumber yard for MORE 2x4's.  I mis-measured the first time and made my legs too short.  MEASURE TWICE and CUT ONCE!
P.S. The lumber yard will more than likely cut your wood for you so it will fit in your car.....if you don't own a pickup truck. *wink*
 

I inserted each bolt into all the holes just to make sure they would fit before I attached the legs to the door.


I attached the legs, top and bottom, to the door using 2-1/2" zinc plated construction screws.  4 on the top and 4 on the bottom.

NOTE: In case any ladies want to know, I use the smaller Milwaukee Fuel drill because its very light weight and doesn't wear me out to use it.  It has multiple heads that you can switch out for different jobs.  Drilling holes, screwing in screws...etc.

I used a furniture clamp to hold my leg in place while I attached it to the door.  This method works great when you're working alone.


To get your leg placement correct, you will measure bolt hole to bolt hole on your bed frame plate.  Mine was 59 inches, but yours may differ, so be sure to measure.

Now to attach the new headboard to the bed frame.

I carried this beast up stairs into my house and narrowly squeezed me and the headboard, with its long legs, around a couple of turns to get to my bedroom.  It was heavy yall and I had to take a breather before I attached it to the bed. Whew!  Help, with muscles, is suggested to transport the finished product! lol!

I think I may go back and put felt on the feet of the leg just to keep it from scratching my floors.  I probably should have sanded the rough edges too, but I think I was overly excited to get it done and up and totally forgot that step!


I'm really enjoying it so far and I'm not even worried its going to fall on my head in the middle of the night because I feel like I did a pretty good job at putting it together!
 
Find my chenille bedspread HERE.

What do you think? Would you ever use an old door to make a headboard?  I'm thinking I'll be on the look out for another door to make a foot board now!

If you loved any of these ideas and want to save them for later, be sure to pin it to your favorite Pinterest board.  I have a Pinterest board set up for all kinds of bedroom ideas and its called Master Bedroom Ideas I LoveI'm pinning something new on Pinterest every day. Won't you join me?

***I am a participant in the Amazon Services LLC Associates Program, an affiliate advertising program designed to provide a means for me to earn fees by linking to Amazon.com and affiliated sites.***

Pin It!

Sunday, August 7, 2022

My Bedroom Refresh

Hey there! Hello!

So, I refreshed my bedroom.....again! Lol!  Yall, I have a problem with bedding, I collect it.  I'm just going to be honest, I already have more coming because I'm building a new headboard for my bed!

I serve it up on a silver tray at my house.....old books and thrift store finds that is!😆

I recently got a new blanket from Downlite Bedding.  This is the Queen SmartDown Blanket with the Double Diamond pattern.  Use code DYGEN20 to save 20% off your entire order!

The Sunflower blanket is from Ownkoti, this is the reverse side.  Check out all the details and get a discount for it too by going HERE.

Both pieces of bedding are approved by the fuzzy people.  They are always the first ones to try out new bedding in my house!

If you want super duper soft sheets, these are the ones for you! Look right here for the sheets!  They are currently less than $19! Woot, woot!

Let me know if you have any questions, I'll be happy to answer anything you may think of.  All of these pieces are machine washable and all wash up and dry like a dream.

Well, it looks like we have to go now.  Someone is tired and needs a nap! I hope you have a great day!

***Just so you know, I DO NOT share anything here that I don't love and haven't already tried first myself, I would not do that to you!  I also try and get discount codes if I can to save you $$$! Who doesn't love a good deal!

If you loved any of these ideas and want to save them for later, be sure to pin it to your favorite Pinterest board.  I have a Pinterest board set up for all kinds of bedroom ideas and its called Master Bedroom Ideas I LoveI'm pinning something new on Pinterest every day. Won't you join me?

***I am a participant in the Amazon Services LLC Associates Program, an affiliate advertising program designed to provide a means for me to earn fees by linking to Amazon.com and affiliated sites.***

Pin It!

Sunday, July 10, 2022

Summertime Sunflowers for your Home

Hello there!  I have been busy trying to stay cool.  How have you been?

Does this beautiful Blooming Sunflower Cotton Reversible Soft Quilt not just scream summertime to you?  If you love sunflowers like I do, oh boy do I have a bargain for YOU!

If you need something to brighten up your home for summertime, use my code TEXAS15 to go shopping and save 15% off your order! Ownkoti is one stop shopping for all your home beauty needs!  They have so many beautiful and fun pieces and guess what?  They are already really affordable, but when you use my discount code, its even better!

Actually this bedspread could take you right into Fall as well.  I've had it on my bed ever since I received it on my doorstep!  It makes me so happy just to see those big sunflowers!

Did I mention that it is reversible?  Did I also mention that sometimes I'm a bad blogger and forget to snap pictures of the back side of my new quilt? Duh! Oh my goodness, sometimes I wonder about myself!  CLICK HERE to see the other side.

I have the Queen size: 79"W x 90"L (200cm x 230cm).  It covers the top of my bed and falls over quite a bit on the sides too.  It's perfect for warm weather sleeping too!

I'm already shopping for my next fun purchase on Ownkoti, maybe I will pick THIS and use them in my living room!  It's just waiting for an update to happen!

What would you pick and for what room, let me know down in the comments!  Also, use my code TEXAS15 to save yourself $$$$!

I'm seriously thinking I NEED these sheets or maybe these sheets to go with my new quilt! So cute!

OH. MY. GOSH.  Maybe I need these too!  I can't decide now! Haha!

Yall have a great day and enjoy your shopping spree!

If you loved any of these ideas and want to save them for later, be sure to pin it to your favorite Pinterest board.  I have a Pinterest board set up for all kinds of bedroom decor ideas and its called Master Bedroom Ideas I LoveI'm pinning something new on Pinterest every day. Won't you join me?

***I am a participant in the Amazon Services LLC Associates Program, an affiliate advertising program designed to provide a means for me to earn fees by linking to Amazon.com and affiliated sites.***


Pin It!

Sunday, April 10, 2022

A Tour of my Girly Bedroom

Hello there!  Sorry I missed posting for a few weeks, but I just haven't really felt like it.  I'm just taking it day by day over here.

I've never really had a girly bedroom, until now.  I'm slowly making it feel cozy and comfy.

In this post you will see different bedding variations.  I like changing up the bedding quite often. Apparently, that's NOT normal! Haha!  I have LOTS of different bedding sets that I change out frequently.  Over on Instagram people are amazed that I have so many sets?  IDK, it's normal for me!


This is currently what it looks like, magical fan and all!  The cats and I have never lived in a house where we could open the windows and let the fresh air in.  I remember having our windows open when I was a kid and I loved it.  I'm happy to enjoy open windows again.

These sheets that I found on Amazon are so buttery soft and comfy to sleep in.  Guess what? They are under $20 for a queen size set!  They come in several prints and colors. Hurry and get you some right here.


 Hazel loves my bedroom too.  All three cats do really.  You can usually find them right here on the end of the bed.

A lot of my decor comes from Amazon, not gonna lie!  This beautiful rose garland was an excellent touch to my girly room and these soft green pillow covers where the perfect pop of color to my white bed.


This duvet cover and pillow shams are a ruffled beauty and I LOVE IT!  They are from Kotton Culture.  They are the Sirena Shabby Chic set.

This bed set is also a favorite.  I got it as a Christmas gift to myself .  I'd been watching it for a long time, but the price was a bit up there and I couldn't get it.  At Christmas is was marked WAY down, so I go it!  It is BEATIFUL!  Find it here.

Also, my magical fan up there is favorite new installation in my room.  


Yes, it has blades, but they disappear when its not in fan mode.  How cool is that?  Find it right here.  My sweet oldest son came over and we installed it in no time flat!  I love that it just looks like a light fixture until you turn on the fan.  So fun!

My curtains/sheers are from Dollar General, yep, the good ole DG!  Can you believe it?  They are the Sheer Reba.  I love them so much that I also have them in my office.....oh and my bathroom too! I needed LOTS and they're very affordable.  They have lots of really pretty curtains at DG, not just these of course.

I gotta get back to my laundry now, yall have a fabulous day!

See more pretty pictures over on my Instagram page.

If you loved any of these ideas and want to save them for later, be sure to pin it to your favorite Pinterest board.  I have a Pinterest board set up for all things in my bedroom and its called Master Bedroom Ideas I Love! I'm pinning something new on Pinterest every day. Won't you join me?

***I am a participant in the Amazon Services LLC Associates Program, an affiliate advertising program designed to provide a means for me to earn fees by linking to Amazon.com and affiliated sites.***

Pin It!

Sunday, November 7, 2021

Fall Bedding in my Bedroom

Hello there!

I have the BEST news! We sold the house and we close on November 10th.

Also, I've already found MY new house and I will be closing on it December 1st! Woohoo!

I'm hoping to get moved quickly so I can decorate for Christmas.

Now, how about my Fall bedroom?

I love decorating my bedroom for each season.  It makes me happy to snuggle into my bed at night and enjoy the festive look all around me!  Hazel enjoys it too, as you can see!

She especially enjoys my new Downlite Tommy Bahama Get Cozy Comforter!

Use this coupon code for your very own snuggly bedroom maker! DYGEN20 takes 20% off everything at Downlite Bedding Company right now!

Um hello, Christmas gifts that your people will LOVE!

Do you decorate your bedroom for the holidays? Let me know in the comments below.

Here's a dup for my bedding above, so pretty!

Yall have a wonderful day! :)

It doesn't have to be done all at once.  It is a slow process in the works! C-ya next time!

If you loved any of these ideas and want to save them for later, be sure to pin it to your favorite Pinterest board.  I have a Pinterest board set up for all things Master Bedroom related and its called Master Bedroom Ideas I LoveI'm pinning something new every day. Won't you join me?

GREAT NEWS!  I have an Amazon Storefront!  If you ever want to purchase anything I'm showing you here, you can pop over to my shop and see what I've picked out and am probably using in my home right now! Click right here to visit.

***I am a participant in the Amazon Services LLC Associates Program, an affiliate advertising program designed to provide a means for me to earn fees by linking to Amazon.com and affiliated sites.***


Pin It!

Sunday, March 29, 2020

Vintage Look Chenille Bedspread Review

Hello and welcome!  I'm not going to harp on our worldly situation too much today, but this was one strange week at work this week!  Our patients visiting the clinic have dropped tremendously!  Where we would normally see 100 plus people per day, we are only seeing 20-30 patients per day now.  Actually, yesterday, we saw 9 people in a 9 hour day. I don't know if people are afraid to go out where there might be other sick people or they're just practicing their social distancing skills and staying home.
Enough of that!  Now I have something fun to think about, which is what I prefer to do as much as possible, think of fun stuff!  I have a quick little review of this beautiful vintage looking chenille bedspread that I found on Amazon.  If you love the vintage look like I do, then you're going to need one of these bedspreads too!

As you can see, Zel is helping me model this beautiful bedspread!  He makes every picture look 100% better!  Just look a the detail on this bedspread! We have a queen size bed.  This is the BrylaneHome Georgia Chenille Bedspread, I got the queen size in Ivory and its fits perfectly with plenty of length all the way around.  I hate when a bedspread or quilt is too short to hang over properly, but not this one, its perfect!
Here in this shot I have the spread pulled up enough to fold the pillows into the top to create a sham look.  They also offer the actual shams in either standard or King size, which I have not gotten yet because they are a little too spendy for me right now, but they are just as beautiful!  However, I just checked and the bedspread is marked even lower than I paid for it (darn it) at $58 right now!
This bedspread reminds me of my Granny's house!  She always had white chenille bedspreads on her beds too!  This one is soft and comfortable and washes and dries up like a dream!  Did I mention it has fringe?  YES, it has fringe! So cute!  Hurry and get one before the price goes back up!

Oh, and just in case you're wondering about those cute animal pillows back there, those are pillow covers that I got from the Three Little Mommas shop.  They have the cutest pillow covers, go check them out and tell them I sent you!

If you loved this idea and want to save it for later, be sure to pin it to your favorite Pinterest board.  I have a Pinterest board all set up just for Master Bedroom Ideas and all kinds of other fun stuff and, I'm pinning something new every day. Won't you join me?

GREAT NEWS!  I now have an Amazon Storefront!  If you ever want to purchase anything I'm showing you here, you can pop over to my shop and see what I've picked out for you! Click right here to visit. You can find this bedspread in the "For Our Home" section.

It doesn't have to be done all at once.  It is a slow process in the works! C-ya next time!


Pin It!

Sunday, December 16, 2018

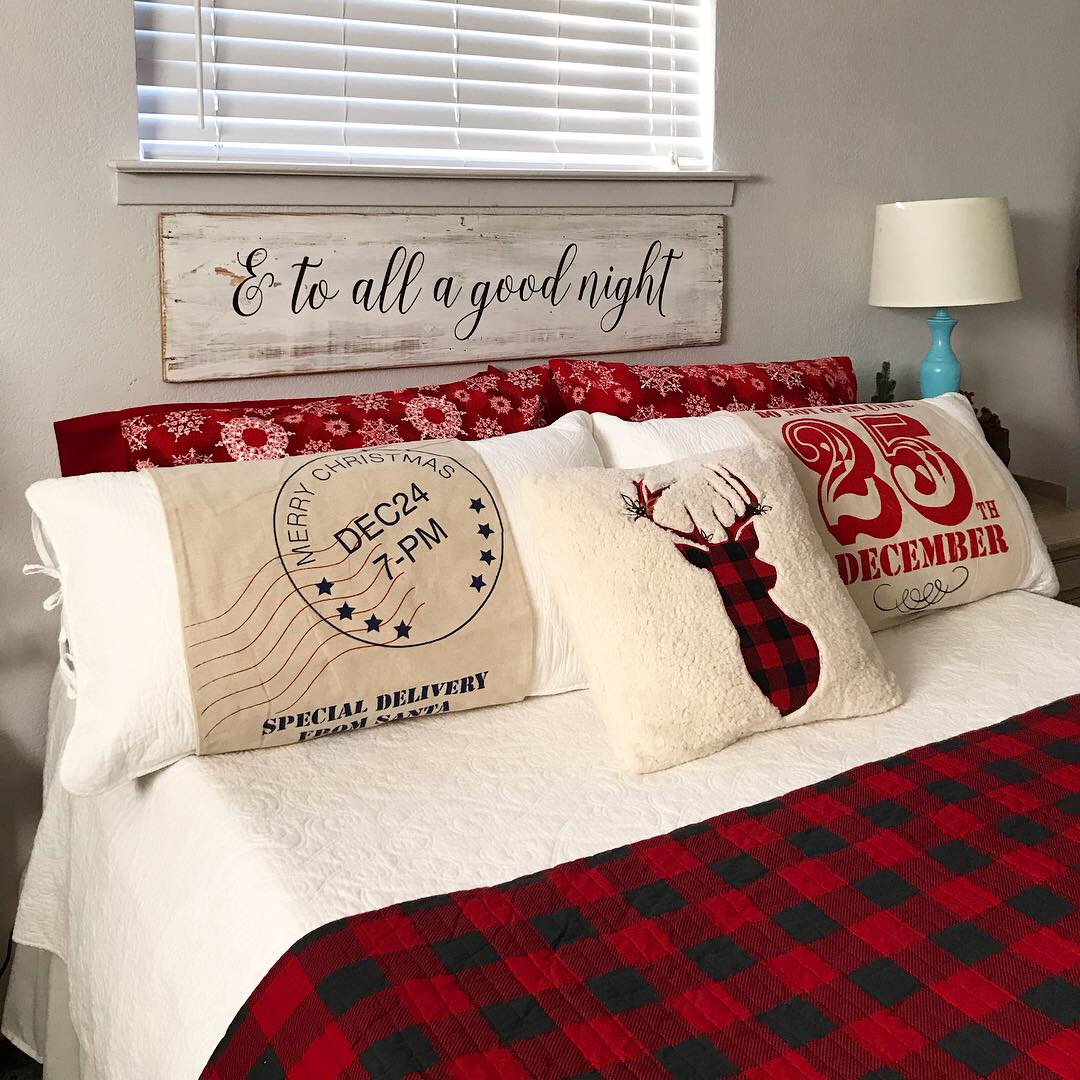
Make Your Own Painted Holiday Sign

You may have seen this sign in my last post and wondered how I made it.  Let me tell you.

Well, you know how you're scrolling along and you see something that really catches your eye?  The first time I saw a sign like this I knew I wanted one for our bedroom.  I immediately went on a search and found out that they are really spendy!  A new expensive sign is never in our budget, much less at Christmas time.  I was just going to have to make my own.
It was really easy to make.  I seriously thought it would be way harder than it was.  I have made a few signs in the past using a different technique, but this is my first time making a sign with a stencil.
A couple of years ago my uncle was cleaning out his workshop and gave us a lot of scrap wood and other things.  I claimed this piece of wood right here as mine the minute I saw it!  To me, it was perfect for the sign I had in mind.  My board is 3' 10" long  x 11" tall x  3/4" thick.
Since I already had the perfect board, my next problem was the beautiful font the sign was done in.  Of course, off to Etsy I went to find a stencil maker.  I found an awesome one with great prices.  Click right here to visit her shop and please tell her I sent you! :)

According to the stencil directions, you have to have a smooth clean surface for the stencil to work properly.  First I used a damp rag to clean off the dust on my board.  Then, I used some white acrylic paint and gave my old board a little dry brushing to fill in some of the bare wood spots and to make it as smooth as I possibly could.
The one time use stencil comes with step by step instructions on how to use the stencil.  So easy yall!
TIP: Before you peel the backer paper off your stencil, center it on your board and make pencil marks on the corners so you know where to place the stencil after you've peeled the backer paper off.
For best results, make sure you follow all the directions that comes with the stencil!  I spent extra time smoothing my stencil onto my board.  After I smoothed all that I could smooth, I gently (keeping my hand slightly against the board) started peeling the topper paper off my stencil.

TIP: GO SLOW and keep you hand resting on the board.  You do not want to pull straight up on your topper paper.  Your stencil will not fare well!
This is how my stencil looked after I had the topper paper removed.   Now I was ALMOST ready for paint.
I used my thumb and went around the edges of all the letters to make sure the stencil was tight to the board before I started painting.

TIP:  If the stencil is not stuck well, you will have seepage and that's not pretty!
For the lettering I used black acrylic paint and a sponge brush.  With very little paint on my brush, I gently tapped on my paint in thin coats.
This is how it looked after I got all the paint applied.  After I covered all the lettering with paint, I looked closely to see if I could see any white spots showing through and touched up if I did.

I was home alone the day I made this sign so I couldn't take pictures of myself removing the stencil, but you will want to remove your stencil BEFORE your paint dries completely.

After I removed the stencil I had a few places that needed a little touch up, so I grabbed a fine tipped brush and my paint and I did just that.  When I was sure the paint was dry, I used some fine sand paper and went over the whole thing to distress it a bit.  I did not seal it because its not going to be out in the weather or anything like that.
I so love how it turned out! I was so proud of myself for making this sign that looks so pretty over our bed.  I'm going to have a hard time taking it down after Christmas is over.
If you loved any of these projects and want to save it for later, be sure to pin it to your favorite Pinterest board.

Want to see more Christmas Ideas?  Click on the links below.

Vintage Tablecloth Curtain - The Christmas Version

How to Make Stove Top Potpourri

Countdown to Christmas with Free Printables

Peppermint Pretzel Bark - A Sweet Little Gift 

Clothespin Snowflake Ornament

DIY Vintage Christmas Decor

Christmas Shutter Decor

Clothespin Christmas Tree

Our Front Porch Tree

How to Wrap a Gift

Our Burlap Forest

Twig Snowflake Ornament


It doesn't have to be done all at once.  It is a slow process in the works! C-ya next time!
I'm Linking to:
These lovely and FUN parties!
Between Naps on the Porch
The Dedicated House  - (I was featured

Pin It!
01 09 10