Showing posts with label Kitchen. Show all posts

Sunday, November 14, 2021

Retro Kitchen Appliances - My New Red Toaster

 Hello there!

We signed our house over to the new owners last Wednesday.  I also started the process on the purchase of my new home on Wednesday as well.  I've been packing and packing and packing too!  Guess what else I did?

I decorated for Christmas, but only in the living room! I know, that's the silliest thing ever because duh, I'm moving really soon, but I LOVE CHRISTMAS!

Also, I need things to snap pictures of for my Instagram account. Lol!

Anywhooooobs, do you remember my red hand mixer that I showed you here?  This is the matching toaster and I love it too!  So retro and fun and it works excellent!

Visit the Redmond Store and just look at all the wonderful retro kitchen appliances! They have a wonderful selection and they make great Christmas gifts too!

These are large slices of bread yall and they have no trouble fitting right in this toaster!  I was amazed when I tried it out for the first time!

It's retro look is so fun for your kitchen counter tops and it toasts up your bread perfectly.  You get the vintage look but the modern day quality with this toaster!

Would you love to get these vintage inspired kitchen appliances for Christmas?  I sure would! :)

Yall have a wonderful day!

It doesn't have to be done all at once.  It is a slow process in the works! C-ya next time!

If you loved any of these ideas and want to save them for later, be sure to pin it to your favorite Pinterest board.  I have a Pinterest board set up for all things Kitchen related and its called Kitchen GoodnessI'm pinning something new every day. Won't you join me?

GREAT NEWS!  I have an Amazon Storefront!  If you ever want to purchase anything I'm showing you here, you can pop over to my shop and see what I've picked out and am probably using in my home right now! Click right here to visit.

***I am a participant in the Amazon Services LLC Associates Program, an affiliate advertising program designed to provide a means for me to earn fees by linking to Amazon.com and affiliated sites.***


Pin It!

Saturday, October 9, 2021

Mixing Up Goodness in Vintage Pyrex

Hello there! I'm here again for an update and to share something fun!

The house still has not sold.  We've had some offers, but they were all extremely unacceptable.  The last offer we entertained wanted us to get out in 10 days, what??? We could not do this as we have no place to be even if we could pack it all up and move out in 10 days.  It was a low ball offer anyway.  The others were as well.

I know that the right family will come along soon.

Anywhooooobs, let's move along to this great gift idea right here.  I had to come on here and let you know because its an awesome mixer and you or someone you know who loves baking NEEDS one for Christmas!

This mixer was gifted to me on IG and I LOVE IT! Of course it's even better that its my favorite color too! Click here for details on IG.

The REDMOND Hand Mixer is Electric, it is a 5-Speed 300W Power Hand Mixer with Turbo Handheld Kitchen Mixer.  It includes Beaters, Egg Sticks and Dough Sticks.

Trust me when I say you need one, it's awesome!  Use my code 7VAQIH4X to save 40% off, but hurry, my code is only good until 10-14-21.

I have been busy trying to keep my mind off things, that's hard to do sometimes, but mixing up a batch of Pumpkin bread helps!

You know what else helps?  My vintage Pyrex mixing bowls!  I've had this set for 35 years.

If you like vintage Pyrex and want to brush up on your knowledge of it, look right here!  So many fun facts and interesting things I never knew.

In my area of Texas, its hard finding the vintage Pyrex at reasonable prices, but every now and again I do and I immediately go look up what I've found and see what it might be worth!  So fun!

Well, that's all for today, I've got a list as long as my arm to check off and get done so I'll try and not be such a stranger on here from now on!  Thank you so much for hanging around and waiting on me to blog every now and again!  I hope you are all doing well!

If you loved any of these ideas and want to save them for later, be sure to pin it to your favorite Pinterest board.  I have a Pinterest board set up for all things backyard related and its called Kitchen GoodnessI'm pinning something new every day. Won't you join me?

GREAT NEWS!  I have an Amazon Storefront!  If you ever want to purchase anything I'm showing you here, you can pop over to my shop and see what I've picked out and am probably using in my home right now! Click right here to visit.
 

It doesn't have to be done all at once.  It is a slow process in the works! C-ya next time!

***I am a participant in the Amazon Services LLC Associates Program, an affiliate advertising program designed to provide a means for me to earn fees by linking to Amazon.com and affiliated sites.***


Pin It!

Sunday, June 28, 2020

Welcome to My Small Farmhouse Kitchen

Before we pack all of this up to move, I thought I'd show you some of the decor I'm using in the tiny house rental kitchen. Maybe my ideas will give someone else a bit of inspiration to refresh and decorate their own kitchen.

We will be closing on our new home this coming new week.  Even though moving is not fun, we are very excited to get moved into our new home soon!
If you like to change things up often like I do, one thing that's easy to do to create a new look for your kitchen is to cover the counter tops with contact paper.  The counter tops in this kitchen did not match at all.  I have this thing about things matching, so contact paper was my solution!  I did these countertops when we first moved in and are still going strong, almost 7 months later.  If you want to see the before pictures, click right here.
In the very first picture up above you can see way at the end, a watermelon warmer.  I have since changed it out for my new hen warmer. Tell me she’s not adorable! Oh my gosh, when I saw her, I needed her!  She’s a Scentsy warmer and she’s currently warming up some Coconut Cotton wax and the scent is wonderfully clean!  You can get one too by visiting Katie right here.  Tell her DeeDee sent you!

Also, you can get my hand stitched crocheted edge kitchen towels that you see here by visiting my Instagram @ddcamp170 and clicking on the TOWELS highlight button.
On the left hand side of the sink I have several pieces of my Pioneer Woman collection.  If you've been following me for a while, you'll know that I love PW and have had these pieces for quite a while!  They go well in any farmhouse kitchen decor, they're affordable and you can get them at Walmart!
I'll be honest with you, this kitchen does not have a dishwasher, so all of this pretty stuff gets pushed aside and the dish drain rack comes out and sits here on a daily basis.  You never know how much you miss a dishwasher until you have to hand wash every single dirty dish that you make when cooking a meal.
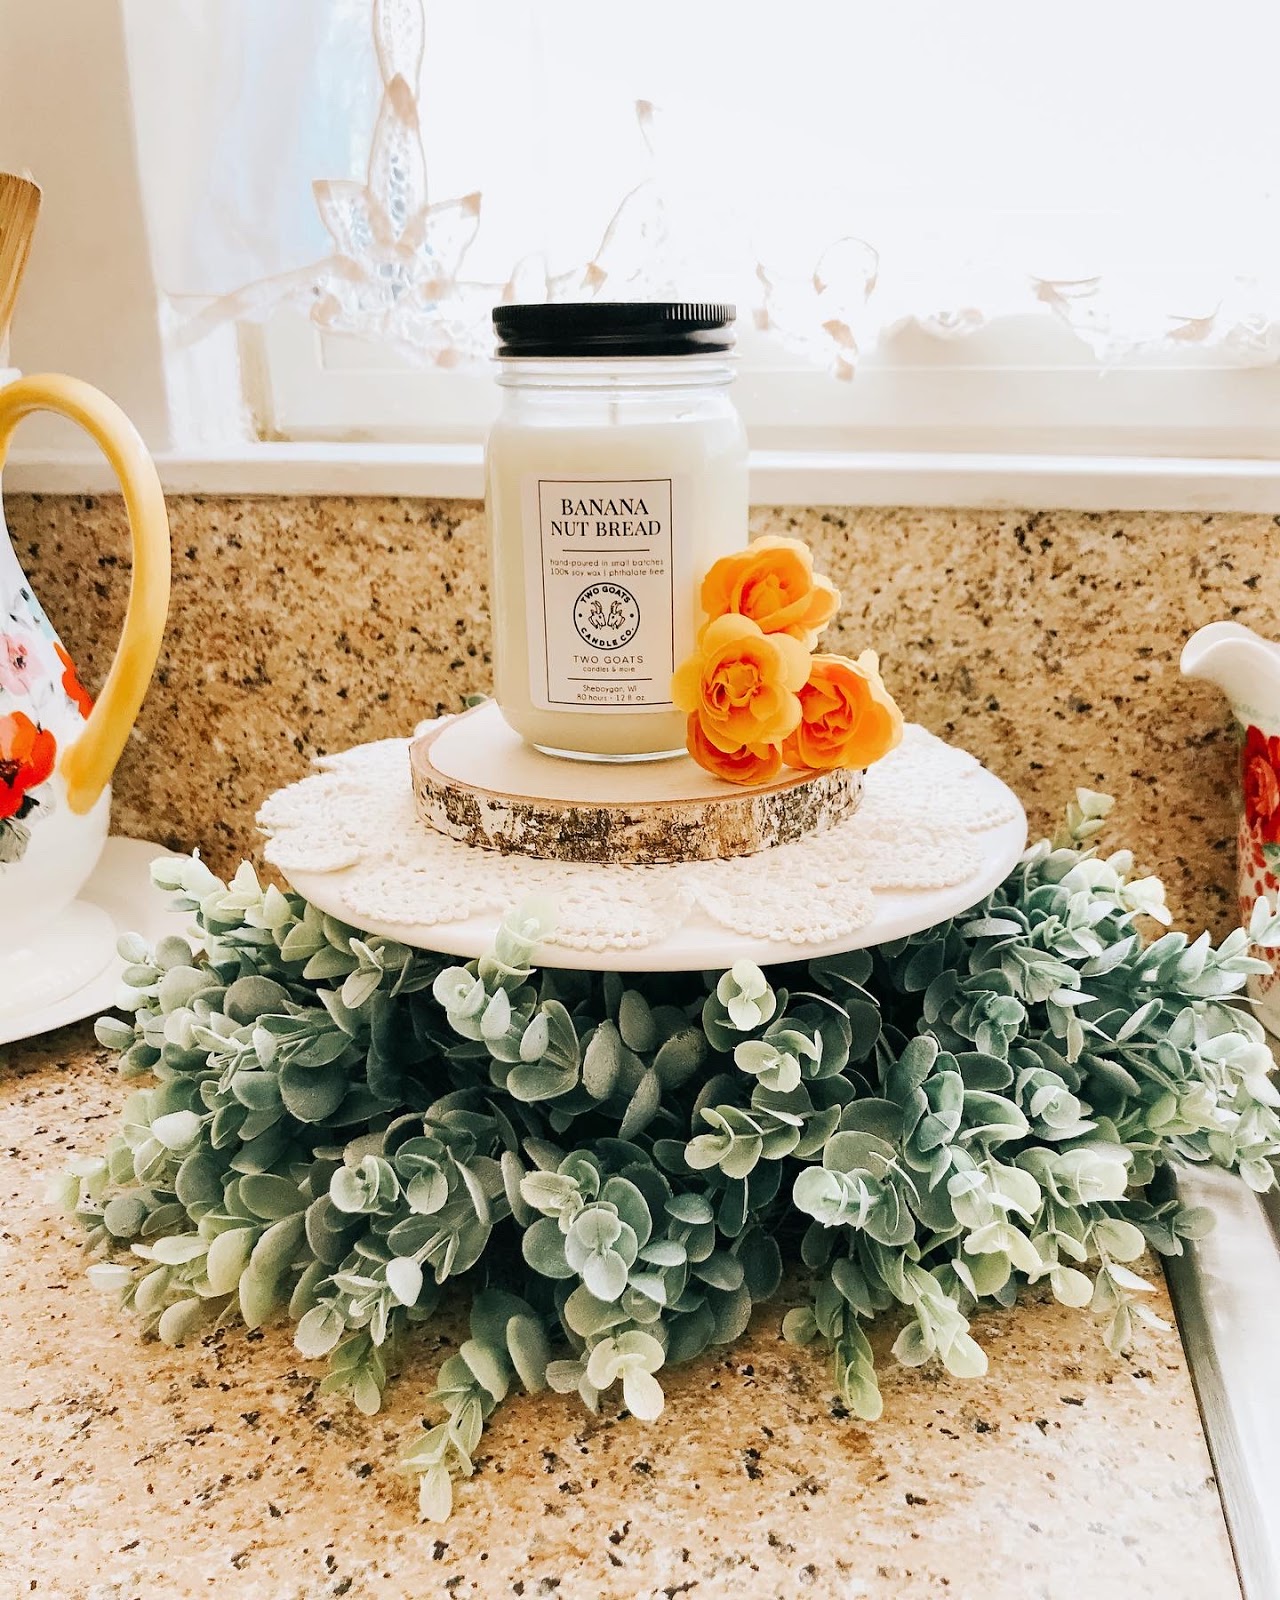
This is my new favorite Two Goats Candle Co candle, Banana Nut Bread.  If you haven't tried one of these candles yet, you should really get one!
These candles are 100% vegan soy, have cotton wicks and look how cute they are with my decor!

Now for the good part, shipping is FREE anywhere in the US! Purchase now through August 1, 2020 and Two Goats Candle Co will donate 20% of the sales made to the Black Lives Matter Global Network Foundation! Tell them DeeDee sent you! CLICK HERE to check it out!

Sometimes I use my Pioneer Woman colander to decorate along with one of my vintage embroidery tea towels that my Aunt made for me when I was still just a girl.  As you can see, my colander often holds my freshly picked tomatoes from the garden.
Another fun thing I like to do is save a veggie can and plop a sweet little plant in it for a little bit of life on the counter top! So adorable!
This is a view I rarely share because its just not pretty, but here it is anyway just so you can get an idea of how the kitchen is set up.
On the opposite side of the kitchen is the coffee bar that also shares space with the microwave.  Obviously the little vintage bar stool doesn't live there, but its cute for a quick photo shoot for IG! Haha!

If you loved this idea and want to save it for later, be sure to pin it to your favorite Pinterest board.  I have a Pinterest board set up just for all things kitchen related and its called Kitchen Goodness and I'm pinning something new every day. Won't you join me?

GREAT NEWS!  I now have an Amazon Storefront!  If you ever want to purchase anything I'm showing you here, you can pop over to my shop and see what I've picked out for you! Click right here to visit.

It doesn't have to be done all at once.  It is a slow process in the works! C-ya next time!


Pin It!

Sunday, June 8, 2014

DIY Mosaic Tile Backsplash

As I've said in my last two posts, here and here, we've been working on the kitchen again. The step I'm writing about today has made the kitchen look almost complete!  Backsplash time!
We used three different tile combinations to create our backsplash.  A mosaic tile with glass and natural stone and two different shaped natural stones, one subway and one square.  We used 17 mosaic tiles and 1 each of the other two.  My honey came up with the idea to add a little extra detail along the center line to give the whole thing a unique look instead of just using the mosiac tile for the whole thing.  Good thinking baby!

This is what our backsplash looked like for oh, almost as long as we've lived here.  They had this ugly green vinyl floor tile on it when we moved in.  You can see it here.  I preferred this look to the ugly tile! LOL!
To protect the counter tops from any unnecessary spills, we used a plastic drop cloth that we taped on with painter's tape.  The mosaic tiles we used are from Lowe's (links above).  They come in a 12 x 12 tile with a mesh backing. Very handy invention!  My honey used his level to create a straight line for cutting the tile.  This was the first tile he started out with.  He lined it up with the outer edge of the counter top and then sat it on top of the counter top's back splash using 1/4" tile spacers.
He used our Kobalt wet saw that we originally purchased from Lowe's when we tiled our kitchen floor here.  A very good investment for all the tiling we have planned for our house.
This is just one of the tiles we used for the center line detail.  I forgot to snap a picture of the little square ones.  They also came in a 12 x 12 tile that was all held together with the mesh backing.  I used a utility knife to cut them into little individual tiles.  Same for the square ones.
NOTE:  When working with mosaic tiles, it is a good idea to have your tiles laid out in the order you want to add them to the wall.  They interlock with each other in a certain way.  If you don't cut them properly they will not line up and fit together correctly.  We bought a large bag of mortar to adhere the tile to the wall.  There is a 2 hour window that your mortar will be good to use, after that, its NOT going to work properly.  We learned that from experience and I was at Lowe's at 9pm buying more mortar to finish the job.
We used two sizes of tile spacers.  1/8 of an inch and 1/4 of an inch.  This was just our preference, but its something you'll need to decide before you get started.  You can see the different sizes in the picture above.  You can also notice we used the larger spacer (1/4") between the counter top and tile.  NOTE: Only place mortar where you are currently working.  The mortar dries out pretty quickly.
At first we were slow going, but after we had an idea of the steps we needed to take for our design, it moved along nicely.....until we discovered our mosaics weren't lining up like I noted above! LOL!
Make sure you have lots of spacers.  You will need them to make sure you have proper spacing of your tiles.  We may or may not have over used our spacers, but we wanted to make sure it was all even as we went.  Notice that I covered the corners of my freshly painted, newly built window sill (that's another post) with painters tape.  I didn't want to have to worry about the mortar or grout getting all over it.
My honey used the grout spreader for giving even pressure after he applied each tile section.  This makes sure the tiles are getting good adhesion.  A little tip we learned on the DIY channel!
This is the next morning after we stayed up until 1:15am adding little bits and pieces of the mosaic tile to fill in all the blank spots we had left over after adding all the full size pieces.  There were lots, but mostly under the cabinets, so it was tedious work! Whew!
I used warm water and a sponge to clean up the tiles and ready them for grout.
We then put the plastic tarp back up and we were ready for grouting.  Because our mosaic tiles had glass in them, we used an un-sanded grout in the color of  French Vanilla.  When mixed it looked like melted vanilla ice cream...no joke!  Since we were both grouting, I didn't get any pictures of that step, but you want to work quickly and clean as you go as much as you can.  The grout really loved the natural stone tiles and it was rather difficult getting it off them when we started cleaning.  NOTE: The package recommended waiting 15 to 30 minutes before clean up, we waited 30, we should have started at 15 and it may have been much easier on the cleanup.
Needless to say it turned out BEAUTIFUL!  We love it!  Pretty good for mosaic tile rookies!
I still walk into my kitchen and cant believe how it turned out and how much of a difference it makes. Love it!
We still have a few more things to do before its complete, but we are so much closer now! Stay tuned for how my honey built the window sill and added brand new electric outlets and switches to finish off the "new" look.

If you want to know how I painted the cabinets - click right here.

Would you like to see more about our kitchen remodel?  Click on links below.

Tiling Our Kitchen Floor
Kitchen Cabinet Makeover Part 1
Kitchen Cabinet Makeover Part 2
Kitchen Cabinet Makeover Part 3
Building a Corner Cabinet
Building a Drop in Kitchen Cabinet
Installing a Farmhouse Sink
Pantry Remodel
DIY Mosaic Tile Backsplash
Painting Our Cabinets

It doesn't have to be done all at once.  It is a slow process in the works! C-ya next time!

I'm Linking to:
These lovely and FUN parties!
Between Naps on the Porch
DIY Home Sweet Home
We Call It Junkin 
The Dedicated House

Pin It!

Sunday, June 1, 2014

Pantry Remodel Revealed - You Won't Believe the Before and After

Last week we showed you how we built a drop in cabinet which was butted right against the soon to be pantry.  We had a great response when I posted it on Hometalk and lots of you wanted to see the pantry when it was complete.  Here it is!
We have tons of space now and no longer have to over crowd all the other cabinets just to get it all "put away".  I'm still rearranging and trying to figure out where the best space is for everything.
Here's a peek at what it used to look like and what it looks like now.  If you want to see what it originally looked like when we moved in, look HERE.  Such a huge difference!
This was the final cabinet that needed to be remodeled.  But we aren't done yet!  More to come!
My honey very carefully disassembled the cabinet, piece by piece because he wanted to reuse as much of the existing cabinet as he could...just like all the others.
I had removed all the other old shelf paper when we redid the other cabinets, but this one was the only one left.  Good bye old shelf paper!  Remember the southwest craze in the late 80s early 90s?  Oh I liked it too back then, but not anymore!
Here it is all stripped down to the floor base.  See the two outlets?  My honey sealed up the bottom one because we were not going to need it any longer and the top one he replaced with a new outlet because we plan on putting a lighting system in the pantry later on down the line.
Bead board was added to the back wall to help tie in the other cabinets.  Why you ask? Because the door we add later will allow the inside of the pantry to be visible, so I wanted matchy-matchy!  The shelf cleats were also added after we thoughtfully planned out how far apart to space them.  We grabbed our tallest cereal box for one measurement and stacked two can goods on top of one another for the next measurement and so forth and so one until we reached the top.  The shelf you see here was the only one original to the previous cabinet.
Next the shelves were cut using 3/4" plywood.  Must be sturdy to hold all the weight.  Then the pantry lived like this for one week.  We both work full time, so we remodel on the weekends only.  When the new door is put together some day soon, the bottom of the pantry will not be visible.  I store all of my larger counter top appliances in there.
Now for paint!  I used the same sage-y green I used in the dining room here.  I love this Valspar paint from Lowes.  It only takes two coats and you're done!  The paint color is called Jekyl Crane Cottage Green.  I used my paint tray trick again, line it with foil for a fast clean up job.
First coat looks a dab scary, but just wait, it gets better.
See, now its just he right green!  This paint dries fairly quickly too.  Another thing I like about it!
I painted the under side only of each shelf.  Assembly line style out on the patio worked perfectly for the task.  I chose not to paint the tops because I knew I was adding shelf paper and it seems to stick to bare wood better than the painted wood.
Just to add, we wanted to do slide out shelves but the hardware is very spendy.  Since we are on a tight budget right now, we chose to wait on that feature for a later time.  Now for the facing.  My honey took the facing that he saved from the original cabinet and reworked it to fit the new pantry.  It's ready for paint and then shelf paper.
I used the same shelf paper I used in all the other cabinets.  See how I did that HERE.  I found my perfect paper at Walmart HERE.
Isn't she lovely, isn't she beautiful!  Everything's better with shelf paper huh? LOL!
One more look at the before and after!  Big change huh?  Some day when it has its "new" door it'll look even more different.  HINT:  My honey scored two old and identical screen doors for FREE!  He plans on making the two into one to fit our new pantry.  Fingers crossed it will work out like we have in mind.

NOTE: We finally did it! Go see right here!
We still have 3 more doors to build and of course the pantry door, but for now I am really enjoying this big ole space my honey created for me!  Wait till you see what we've done next!

Would you like to see more about our kitchen remodel?

Tiling Our Kitchen Floor
Kitchen Cabinet Makeover Part 1
Kitchen Cabinet Makeover Part 2
Kitchen Cabinet Makeover Part 3
Building a Corner Cabinet
Building a Drop in Kitchen Cabinet
Installing a Farmhouse Sink
Pantry Remodel
DIY Mosaic Tile Backsplash
Painting Our Cabinets
Old Screen Doors Get New Life

It doesn't have to be done all at once.  It is a slow process in the works! C-ya next time!

I'm Linking to:
These lovely and FUN parties!
Between Naps on the Porch
DIY Home Sweet Home
We Call It Junkin

Pin It!
01 09 10